In this guide we are going to show you how to install sons of the Forest dedicated server to your local PC or rent one from us. In Patch 07 Sons of the Forest released dedicated servers before this the game used to have p2p server multiplayer.
How to install Sons of the Forest Dedicated Server
The game server can be downloaded from Steam directly (logged in), or completely anonymously (no Steam account needed) via SteamCMD tool.
Method 1: Installing SOTF dedicated server using Steam
The dedicated server will be available in the Tools section of your Steam library. You can also find it using the search bar.

Method 2: Installing SOTF dedicated server using SteamCMD
You can install the SteamCMD tool for Windows directly from Valve’s website, available here: This page also contains the complete documentation of the tool, but you shouldn’t require anything besides what’s in this guide to get started.
To install or update the game, start SteamCMD then type in (with modified install directory if needed, in our example we will install the server to
c:/sons-dedicated
force_install_dir c:\sons-dedicated\ login anonymous app_update 2465200 validate
For more advanced users, it is also possible to chain these commands by directly typing in Windows command line (or from a batch file). This could prove useful if you want to set up automatic auto-game updates for example.
steamcmd.exe +force_install_dir "c:/sons-dedicated/" +login anonymous +app_update 2465200 validate +quit
Method 3: How to create Sons of the Forest Dedicated server using using WindowsGSM
a. WindowsGSM Installation:
- Step 1: Download WindowsGSM from the official website: WindowsGSM.
- Step 2: Choose a location on your computer where you want all servers to be installed and run. Create a folder there.
- Step 3: Drag the
WindowsGSM.Exefile into the folder you just created. - Step 4: Execute the
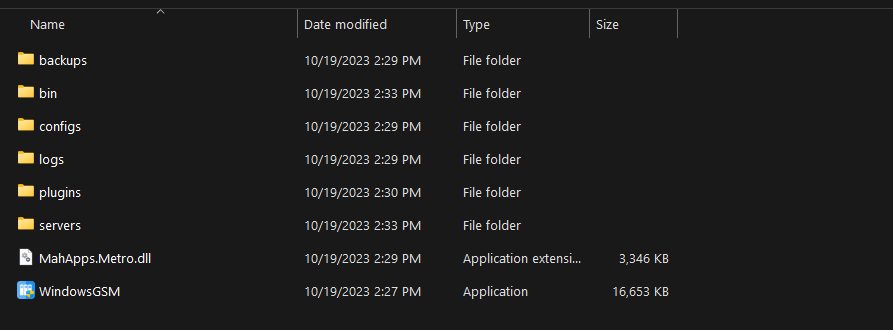
WindowsGSM.Exefile. this will generate extra folders and files i.ebackups,bin,configs,logs,plugins,servers, MahApps.Metro.dll

b. Sons of the Forest WindowsGSM Plugin Installation
- Step 1: Download the latest release of the plugin from GitHub.
- Step 2: Extract the downloaded file.
- Step 3: Move the
SonsoftheForest.csfolder to thepluginsfolder in your WindowsGSM directory.
- In the WindowsGSM interface, click on the puzzle icon located at the bottom left side.
- Navigate to the location of the downloaded plugin and select the zip file to install it.
- Step 4: After installing the plugin, either click on the RELOAD PLUGINS button or restart WindowsGSM to ensure the plugin is loaded correctly.
- Step 5: Navigate to the “Servers” section in WindowsGSM. Click on “Install Game Server” and look for “Sons of the Forest Dedicated Server [SonsoftheForest .cs]” to install.
Making the Sons of the Forest Server available to the internet
In order to allow other players to connect to your sons of the forest dedicated server, you will have to make sure your machine is properly configured to allow traffic on the 3 different ports listed below, and in the configuration file.
Usual required steps are:
- setting up the appropriate Port Forwarding rules on your router or hosting service
- setting up the appropriate rules in your operating system Firewall, and/or in your router/switches built-in firewalls
Required Ports:
- GamePort (UDP): 8766
- QueryPort (UDP): 27016
- BlobSyncPort (UDP): 9700
These ports are the default ports and can be changed in the configuration file which will be discussed later in this guide.
When starting, the game server has a self-test procedure that is going to check if the ports are open and accessible. If the test procedure fails, the server won’t start. In this case, you have 2 options:
- fix your port forwarding
- setup the
“LanOnly”
flag discussed below, which basically excludes your game from the public listing
Exposing a SOFT Server to LAN (Local Area Network)
When making a game available to LAN, you’ll have to consider the following.
- you may want to optionally set the “LanOnly” flag to true if you want to hide your game from the internet search
- in LAN, you shouldn’t need any port redirection if you are running in the same network as the other clients, however you will still have to set up your firewall appropriately
- your local network has to be trusted by your operating system and allow traffic, in order to do this, your Network Profile has to be Private
- there is a known issue when you have multiple network adapters, in some cases Steam will pick up the wrong one to do LAN games discovery and yield no result. If you have any issue, this can be confirmed by temporarily disabling all other network interfaces, and trying again
Sons of the Forest server User Data Folder(Game saves config files & logs)
When running the Sons of the forest dedicated server, it will be using a persistent user data folder for:
- reading configuration files
- saving and loading the game saves
- writing server logs
- etc…
This folder can be either configured to a particular directory, or left to default. The default place where the user data is stored is
C:\Users\<user>\AppData\LocalLow\Endnight\SonsOfTheForestDS
It can be overridden using a command line argument:
-userdatapath "c:/path/to/directory"
If no argument is specified, the default directory will be used.
Throughout this guide, we will make reference to this folder as <user data folder>
Sons of the Forest server Configuration Files location
All configuration files that will be discussed later in this document can be found / must be located in the game <user data folder> as described in the previous section.
This folder will contain:
- the server owners list, in a file called ownerswhitelist.txt
- the game server configuration, in a file called dedicatedserver.cfg
- the saves (if the path is not overridden), in a folder called Saves
- the game settings, in a file called SonsGameSettings
Note that these files do not exist right away after the installation, the game has to be started once for the default files to be created. Not all of these files need intervention to set up the dedicated server.
You should only need to touch:
- ownerswhitelist.txt
- dedicatedserver.cfg
Sons of the Forest server admin setup
In order to be able to administrate your server from in-game directly, you will need to set up server ownership using the ownerswhitelist.txt file. This will allow you, as a player, to have full access to the in-game administration panel (Pause Menu / Players) where you will be able to:
- upgrade other players to administrators
- downgrade other players to guests
- kick guests
- ban and unban guests
How to create the default server ownership file: ownerswhitelist.txt
When first starting the server, the default configuration file will be created in the configurations folder, if it doesn’t exist already. You can either create it like this, or simply create a txt file as described in the following sections.
File name and format
In order to set up server ownership you will have to feed in the steam ids of all “server owners” in the file called ownerswhitelist.txt, one steam id per line. When first starting the server, the default configuration file will be created in the configurations folder, if it doesn’t exist already.
Server owners have essentially the same rights as P2P server hosts, it’s the highest role and gives access to all commands, so make sure to only add trusted people to this list. Below is an example file.
In order to be able to administrate your server from in-game directly, you will need to setup server ownership. Add below the steam ids of every server owner, one steam id per line. To find your SteamID, open Steam and click on your name on the top right, then go to Account Details.
Jane Doe
7987654321987
John Doe
7123456789123
To find your SteamID, you can either navigate to this page https://store.steampowered.com/account/ or directly in Steam click on your name on the top right, then Account Details.
Configuration File : dedicatedserver.cfg
The dedicated game server can be configured with a JSON file in the configurations folder, called dedicatedserver.cfg
How to create sons of the forest server default configuration file
When first starting the server, the default configuration file will be created in the configurations folder, if it doesn’t exist already. You can either create it like this or simply create a JSON file as described in the following paragraph.
File name and format
Our configuration file is written in JSON format. You can find online a multitude of resources that can teach you how to deal with such files. We will list below some basic mistakes when editing JSON files:
- keys are always written in quotation marks and followed up by a semicolon
- a textual value will always be written in between quotation marks “the text”
- integers, floating point values, and boolean (true/false), will be written without quotation marks
- each setting (key-value pair) must be followed up by a comma (,)
Notes:
- some settings can be set to null, which means that they have no value. The outcome depends on the settings and is described in the documentation below
- no setting is mandatory, if the setting doesn’t exist it will be replaced by its default value
- the order doesn’t matter
The file name has to be dedicatedserver.cfg and contains a JSON formatted document that defines all parameters related to the game server configuration. It has to be placed in the configurations folder. Below is the default file.
{ “IpAddress”: “0.0.0.0”, “GamePort”: 8766, “QueryPort”: 27016, “BlobSyncPort”: 9700, “ServerName”: “Sons Of The Forest Server (dedicated)”, “MaxPlayers”: 8, “Password”: “”, “LanOnly”: false, “SaveSlot”: 1, “SaveMode”: “Continue”, “GameMode”: “Normal”, “SaveInterval”: 600, “IdleDayCycleSpeed”: 0.0, “IdleTargetFramerate”: 5, “ActiveTargetFramerate”: 60, “LogFilesEnabled”: false, “TimestampLogFilenames”: true, “TimestampLogEntries”: true, “GameSettings”: {}, “CustomGameModeSettings”: {} }
| Key | Effect | Accepted Values |
|---|---|---|
| IpAddress | Listening interface for the game server, usually 0.0.0.0 if listening on all interfaces. | Any string formatted IPv4 address |
| GamePort | UDP port used for gameplay netcode (Bolt). | Integer |
| QueryPort | UDP port used by Steam to list the server and enable the discovery services. | Integer |
| BlobSyncPort | UDP port used by the BlobSync system to initialize game systems and exchange data. | Integer |
| ServerName | Name of the server visible in the server list and in the Steam contacts. | Any string |
| MaxPlayers | The maximum number of players allowed simultaneously on the server. | Integer (1-8) |
| Password | Adds a password to make your server “private.” Upon connection, this password will be requested from clients. | Any string up to 40 characters long |
| LanOnly | Allows or restricts the server visibility to LAN only. | true, false |
| SaveSlot | When creating a new save, this number will be the ID of the save. | Integer greater than or equal to 1 |
| SaveMode | Game save initialization mode. | “new”, “continue” |
| GameMode | Sets the difficulty game mode when creating a new save. | “normal”, “hard”, “hardsurvival”, “peaceful”, “custom” |
| SaveInterval | How often the game server automatically saves the game to SaveSlot, in seconds. | Integer |
| IdleDayCycleSpeed | A multiplier to how quickly the time passes compared to normal gameplay when the server is considered idle. | Floating-point value between 0 and 1, greater than or equal to 0 |
| IdleTargetFramerate | Target framerate of the server when it’s considered idle (no player connected). | Integer greater than or equal to 1 |
| ActiveTargetFramerate | Target framerate of the server when it’s NOT considered idle (one or more players connected). | Integer greater than or equal to 10 |
| LogFilesEnabled | Defines if the logs will be written to files. | true, false |
| TimestampLogFilenames | Enabled log files timestamping. | true, false |
| TimestampLogEntries | Enables each log entry written to file to be timestamped. | true, false |
| GameSettings | A key-value map of all game settings used to tweak the game (in any mode). | Public Dedicated Server Configuration Guide |
| CustomGameModeSettings | A key-value map of all settings available to customize the game in custom mode. | Public Dedicated Server Configuration Guide |
Sons of the Forest Game Settings
These are extra settings that can be injected in the configuration file inside the “GameSettings” parameter.
"GameSettings": { "Gameplay.TreeRegrowth": true, "Structure.Damage": true },
| Key | Effect | Accepted Values |
| Gameplay.TreeRegrowth | Enable automatic tree regrowth, triggered when sleeping. | true, false |
| Structure.Damage | Allow buildings to be damaged. | true, false |
Custom game mode settings
These are extra settings that can be injected into the configuration file inside the “CustomGameModeSettings” parameter. They will be ignored if the game mode is not “custom” or if loading a save (save mode set to “continue” with a save that exists on the slot), whether is it “custom” or not, since they are set once upon save creation.
"CustomGameModeSettings": { "GameSetting.Vail.EnemySpawn": true, "GameSetting.Vail.EnemyHealth": "Normal", "GameSetting.Vail.EnemyDamage": "Normal", "GameSetting.Vail.EnemyArmour": "Normal", "GameSetting.Vail.EnemyAggression": "Normal", "GameSetting.Vail.AnimalSpawnRate": "Normal", "GameSetting.Environment.StartingSeason": "Summer", "GameSetting.Environment.SeasonLength": "Default", "GameSetting.Environment.DayLength": "Default", "GameSetting.Environment.PrecipitationFrequency": "Default", "GameSetting.Survival.ConsumableEffects": "Normal", "GameSetting.Survival.PlayerStatsDamage": "Off", "GameSetting.Survival.ColdPenalties": "Off", "GameSetting.Survival.ReducedFoodInContainers": false, "GameSetting.Survival.SingleUseContainers": false, }
| Key | Effect | Accepted Values |
|---|---|---|
| GameSetting.Vail.EnemySpawn | Enable enemies spawning. | true, false |
| GameSetting.Vail.EnemyHealth | AAdjust enemy starting health. | low, normal, high |
| GameSetting.Vail.EnemyDamage | Adjust damage enemies can do. | low, normal, high |
| GameSetting.Vail.EnemyArmour | Adjust enemies armor strength. | low, normal, high |
| GameSetting.Vail.EnemyAggression | Adjust enemy aggression level. | low, normal, high |
| GameSetting.Vail.AnimalSpawnRate | Adjust animal spawn rate. | low, normal, high |
| GameSetting.Environment.StartingSeason | Set environmental starting season. | spring, summer, autumn, winter |
| Structure.Damage | Allow buildings to be damaged. | true, false |
| GameSetting.Environment.SeasonLength | Adjust season length. | short, default, long, realistic |
| GameSetting.Environment.DayLength | Adjust day length. | short, default, long, realistic |
| GameSetting.Environment.PrecipitationFrequency | Adjust the frequency of rain and snow. | ow, default, high |
| GameSetting.Survival.ConsumableEffects | Enable damage taken when low hydration and low fullness. | normal, hard |
| GameSetting.Survival.PlayerStatsDamage | Enable damage from each bad or rotten food and drink. | off, normal, hard |
| GameSetting.Survival.ColdPenalties | Adjusts the severity that cold will affect health and stamina regeneration. | off, normal, hard |
| GameSetting.Survival.ReducedFoodInContainers | Reduces the amount of food found in containers. | true, false |
| GameSetting.Survival.SingleUseContainers | Containers can only be opened once. | true, false |
The original Guide was posted on steam community view it here


2 comments