Welcome to the Aloft Dedicated Server Setup Guide! This comprehensive guide will walk you through the process of setting up and managing your own Aloft server. Whether you’re creating a private world for friends or hosting a public server for the community, this guide covers everything you need to know.
Aloft’s dedicated server setup uses PowerShell scripts to create and manage server instances, allowing you to customize your world with features like island count, game mode, and player permissions. The server runs in headless mode (without a graphical interface) for better performance and resource management.
This guide is structured to take you through the entire process step by step, from initial setup to advanced configuration and maintenance. Even if you’re new to server hosting, you’ll find clear instructions and explanations for each part of the process.
Note: To run the server you need a copy of the Aloft game
Prerequisites
- Windows operating system
- PowerShell
- Steam installation of Aloft(Copy of the game)
Initial Setup
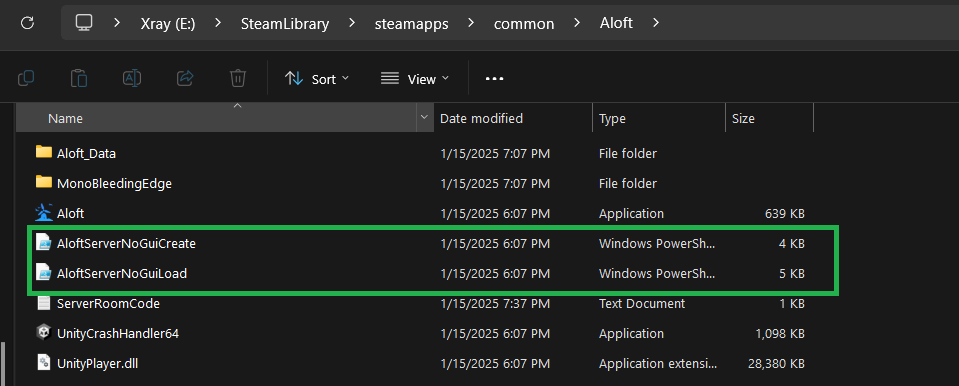
- Locate Server Files
- Open Steam
- Right-click Aloft in your library
- Select “Browse Local Files”
- Locate the following files:
AloftServerNoGuiCreate.ps1AloftServerNoGuiLoad.ps1

Creating a World
Step 1: Configure Create Script
Open AloftServerNoGuiCreate.ps1 in Notepad and locate the $psi.Arguments line. The format is:
-batchmode -nographics -server create#MAPNAME#ISLANDS#CREATIVE# log#ERROR# disablevideo#true#Parameters explained:
MAPNAME: Your map name (NO SPACES)ISLANDS: Number of islands (e.g., 250, 500)CREATIVE: 0 for survival, 1 for creative modedisablevideo#true#: Prevents shader errors in headless mode
Example configuration:
-batchmode -nographics -server create#AloftWorld#250#0# log#ERROR# disablevideo#true#Step 2: Run Create Script
- Right-click
AloftServerNoGuiCreate.ps1 - Select “Run with PowerShell”
- Wait for completion (script will close automatically)

Starting the Server
Step 3: Configure Load Script
Open AloftServerNoGuiLoad.ps1 in Notepad and locate the $psi.Arguments line. The format is:
-batchmode -nographics -server load#MAPNAME# servername#SERVERNAME# log#ERROR# isvisible#VISIBLE# privateislands#PRIVATE# playercount#PLAYERS# serverport#PORT# admin#STEAMID# disablevideo#true#Parameters explained:
MAPNAME: Map name (must match created map, NO SPACES)SERVERNAME: Server name shown in-game (NO SPACES)VISIBLE: true/false – Show in server browserPRIVATE: true/false – Protected home island spawningPLAYERS: Maximum player countPORT: Server port (0 for automatic)admin#STEAMID#: Steam ID for admin (can be repeated for multiple admins)

Example configuration:
-batchmode -nographics -server load#AloftWorld# servername#SuperServer# log#ERROR# isvisible#true# privateislands#false# playercount#8# serverport#0# admin#76561197960287930# disablevideo#true#Step 4: Run Load Script
- Right-click
AloftServerNoGuiLoad.ps1 - Select “Run with PowerShell”
- Watch console output for server code

Step5: Server Code and Access
- The server room code will be displayed in the console
- The code is also saved to
ServerRoomCode.txt - Share this code with players if server is not visible in browser
Logging and Troubleshooting Aloft Dedicated Server
Log Files
- Server logs are written to
output.login the game directory - File is overwritten on each server restart
- Keep logs if reporting issues
Common Issues facing Aloft Dedicated Server and Solutions
- Shader Errors
- If you see “Video shaders not found” errors, ensure
disablevideo#true#is added to both scripts - These warnings can be safely ignored when using this parameter
- ObjectDisposedException
- Usually fixed by adding
disablevideo#true# - Ensure no other server instance is running
- Connection Issues
- Verify server port isn’t blocked by firewall
- Check
ServerRoomCode.txtfor correct code - Ensure server is visible if using browser
Best Practices when setting up Aloft Dedicated Server
- Map Creation
- Start with smaller island counts (250-500) for testing
- Use descriptive map names for easy identification
- Test in survival mode first
- Server Configuration
- Set appropriate player count for your resources
- Consider private islands for griefing prevention
- Keep admin list updated
- Maintenance
- Backup
ServerRoomCode.txtafter creation - Monitor
output.logfor issues - Keep regular world backups
Performance Recommendations
To run Aloft Dedicated server you will at least need
- System Requirements
- Minimum 4GB RAM
- Decent CPU (dual core or better)
- Stable internet connection
- Optimization
- Close unnecessary applications
- Monitor resource usage
- Consider reducing island count if performance issues occur
Security Considerations
- Admin Access
- Only add trusted Steam IDs as admins
- Keep admin list backed up
- Regularly review admin permissions
- Server Visibility
- Use
isvisible#false#for private servers - Control access through room code
- Monitor player connections
Additional Notes
Join the Aloft Discord for community supportPrerequisites
Server restarts will generate new room codes
Keep both scripts and logs for troubleshooting
If you’re looking to rent Aloft dedicated server get one from us


