
You must generate the required server config files necessary to run the server in game on ETS2. To do so you MUST have console enabled.
at
Enabling Console
To enable your console you must change 2 values in the clients config.cfg file located at C:\Users\UserName\Documents\Euro Truck Simulator 2
With the game off simply change the following:
- g_developer “0” —–> g_developer “1”
- g_console “0” —–> g_console “1”
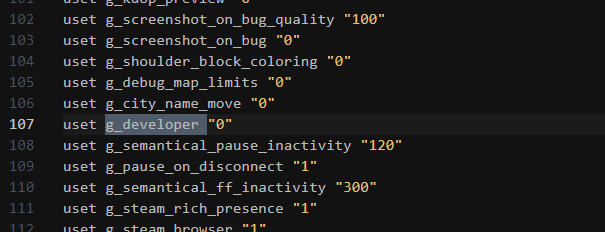
Once those have been changed save and close the file and start up ETS2.
Generating Config Files
Once you have enabled your console and started ETS2, go ahead and log in to game and set up the convoy how you would normally set it up. This includes, any mods that you may have. Also, dont worry about setting up the name, password, description, etc, as the server_config.sii generated will ignore these settings.
Once you have your convoy set up in game, press the ~ key and a console will open on the bottom center of your screen. If a console does not open, close ETS2 and go back up to Enabling Console section and go through those steps again.
With the console open type export_server_packages and press enter. The game will then tell you that the export was successful.
Navigate to the folder that contains your clients config.cfg file that you changed in the Enabling Console section and look for the following:
- server_packages.sii
- server_packages.dat
Copy to Server
With your newly set up files its time to copy them over to the Pterodactyl Panel. Simply upload them through either your preferred SCP program or the file browser in the server panel to the .local/share/Euro Truck Simulator 2/ folder.
On the panel select start server and the server will then start up and create a default server_config.sii file.
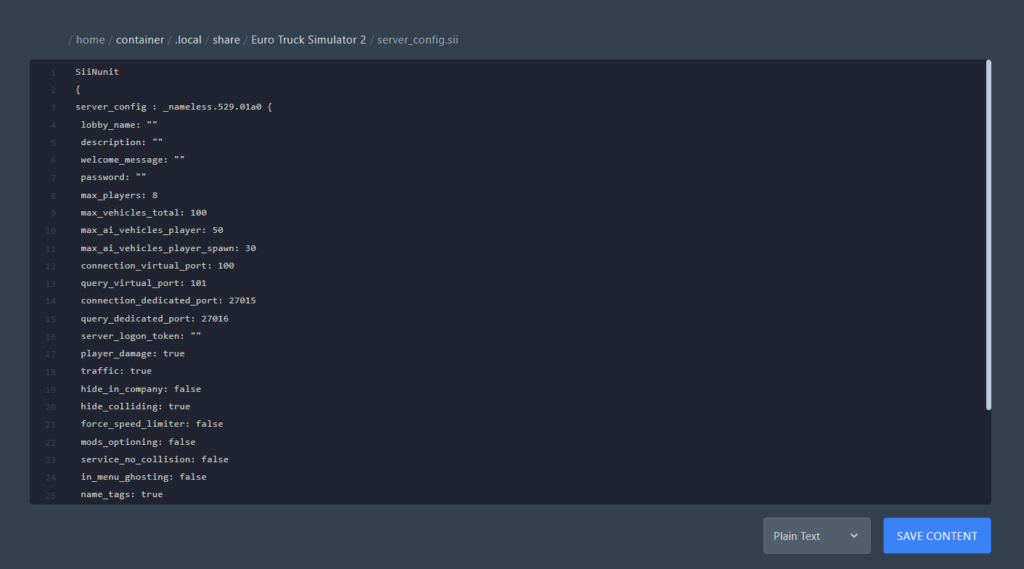
Proceed to the .local/share/Euro Truck Simulator 2

Edit the server_config.sii making changes to name, password etc. This is also where you would change your default ports if needed to suit your Pterodactyl settings. It should look something like this when you are finished:
SiiNunit
{
server_config : *randomly generated string* {
 lobby_name: "Euro Truck Simulator 2 server"
 description: ""
 welcome_message: ""
 password:
 max_players: 8
 max_vehicles_total: 100
 max_ai_vehicles_player: 50
 max_ai_vehicles_player_spawn: 50
 connection_virtual_port: 100
 query_virtual_port: 101
 connection_dedicated_port: 27015
 query_dedicated_port: 27016
 server_logon_token: ""
 player_damage: true
 traffic: true
 hide_in_company: false
 hide_colliding: true
 force_speed_limiter: false
 mods_optioning: false
 service_no_collision: false
 in_menu_ghosting: false
 name_tags: true
 friends_only: false
 show_server: true
 moderator_list: 0
}

}
To add moderators to your server instance you have to also add them to this file. An example seen below:
moderator_list: 3
moderator_list[0]: "Steam64 ID Here"
moderator_list[1]: "Steam64 ID Here"
moderator_list[2]: "Steam64 ID Here",
^^^ Can be found by googling Steam ID Lookup
Enjoy your server
Once those files have been uploaded and configured you are free to start up your server.
When the sever is started look for the line: Session search id: 00000000000000000/101 The number before the / is your search term. This is number to search for in the convoy screen to find your server. You can NOT search by the server name at this time. Example: if your number before the / is 987654321 then you would search for 987654321 on your convoy screen in game.
Steam Server Token
If you are adding a server token received from registering your server at https://steamcommunity.com/dev/managegameservers be sure to use the correct App ID or your server will crash upon startup.
Euro Truck Sim 2 = 227300
Looking for a dedicated Euro Truck Simulator 2 Server Hosting? Rent Now
Ready to play?
Run your own Euro Truck Simulator 2 server with XGamingServer
Spin up an always-on Euro Truck Simulator 2 server your friends can join in minutes — no port-forwarding, no tech headaches.