Where your players first open their eyes is one of the most underrated levers you have as a Project Zomboid server admin. Drop everyone in the middle of Muldraugh and your first night is a meat grinder; spawn a fresh group in a quiet corner of Rosewood and you get the slow-burn co-op start most communities actually want. The behavior is controlled by a single line in your server config and, optionally, a Lua file that defines the cities offered on the spawn screen. This guide walks through both, end to end, with the real key names, file paths, and coordinate format you need.
One version note before we start. Build 41 (B41.78) is the stable default branch on Steam and is what most servers still run, so the values below are written against B41. Build 42 has been on the opt-in “unstable” branch since December 2024 and, as of mid-2026, still is not the confirmed stable release — the latest unstable build in circulation is around Build 42.17. The good news for this topic: the spawn-point mechanics, the three-file config model, and the server folder layout are the same across B41 and B42 in every source reviewed, so this guide carries forward to B42 servers too.
The two ways to control spawning
Project Zomboid gives you two distinct mechanisms, and understanding the difference is the whole game:
- The
SpawnPointkey inservertest.iniforces every player to a single fixed world coordinate. No spawn screen, no choice — everyone lands on the same tile. This is the simplest custom-spawn route. - The
servertest_spawnregions.luafile defines the list of cities/regions players can choose from on the spawn-selection screen. This is how you offer multiple starting towns (or a curated subset) and let players pick.
If you want one mandatory start location, use SpawnPoint. If you want a menu of locations, leave SpawnPoint at its default and edit the regions file. They are not meant to be used together — a non-zero SpawnPoint overrides the region menu entirely.
Where the config files live
A Project Zomboid dedicated server is configured by files inside your Zomboid/Server/ folder. On Windows that is C:\Users\. The default server name is servertest, so the files are all named servertest*. The three files that matter are:
| File | Controls |
|---|---|
servertest.ini | Networking/ports, player cap, PVP, passwords, public listing, mod lists, map, and the SpawnPoint line. |
servertest_SandboxVars.lua | The world ruleset — zombie population, loot rates, XP multipliers, day length, and (in B42) animal/basement/darkness settings. |
servertest_spawnregions.lua | The regions/cities offered on the spawn-selection screen. |
PZwiki also lists a servertest_spawnpoints.lua alongside these. For a deeper field-by-field tour of the main config, see our companion post on the servertest.ini file explained. If you are managing a server on our platform, the full panel walkthrough lives in the Project Zomboid documentation.
Method 1: A single forced spawn with SpawnPoint
Open servertest.ini in a plain text editor and find the SpawnPoint line. By default it reads:
SpawnPoint=0,0,0The value 0,0,0 is a sentinel that means “ignore this setting.” When it is left at 0,0,0, the server shows the normal spawn screen and players pick a city from the available regions. The moment you set any non-zero value, that screen disappears and all players spawn at the coordinate you specify. The format is:
SpawnPoint=X,Y,Z- X and Y are the absolute world coordinates of the tile.
- Z is height:
0= ground level,1= second floor. Stick with0unless you have a deliberate reason to start players upstairs.
A concrete working example looks like this:
SpawnPoint=10629,9312,0Save the file and restart the server (or hot-reload — see below). Every player who joins, new or freshly killed, now wakes up on that exact tile. This is ideal for an RP server where the story begins in one location, a hardcore server where everyone shares a single brutal start, or an event server where you want the group together from second one.
Applying the change without a full restart
If the server is already running, you can apply edits to servertest.ini live. In the server console (or via RCON, no slash) run:
reloadoptionsTo confirm the server actually read the value you intended, run showoptions and scroll to the SpawnPoint line. Note that already-living characters are not teleported by a spawn-point change — it only affects where players spawn from that point forward. To move an existing player to coordinates manually, an admin can use /teleportto x,y,z.
Finding the coordinates you want
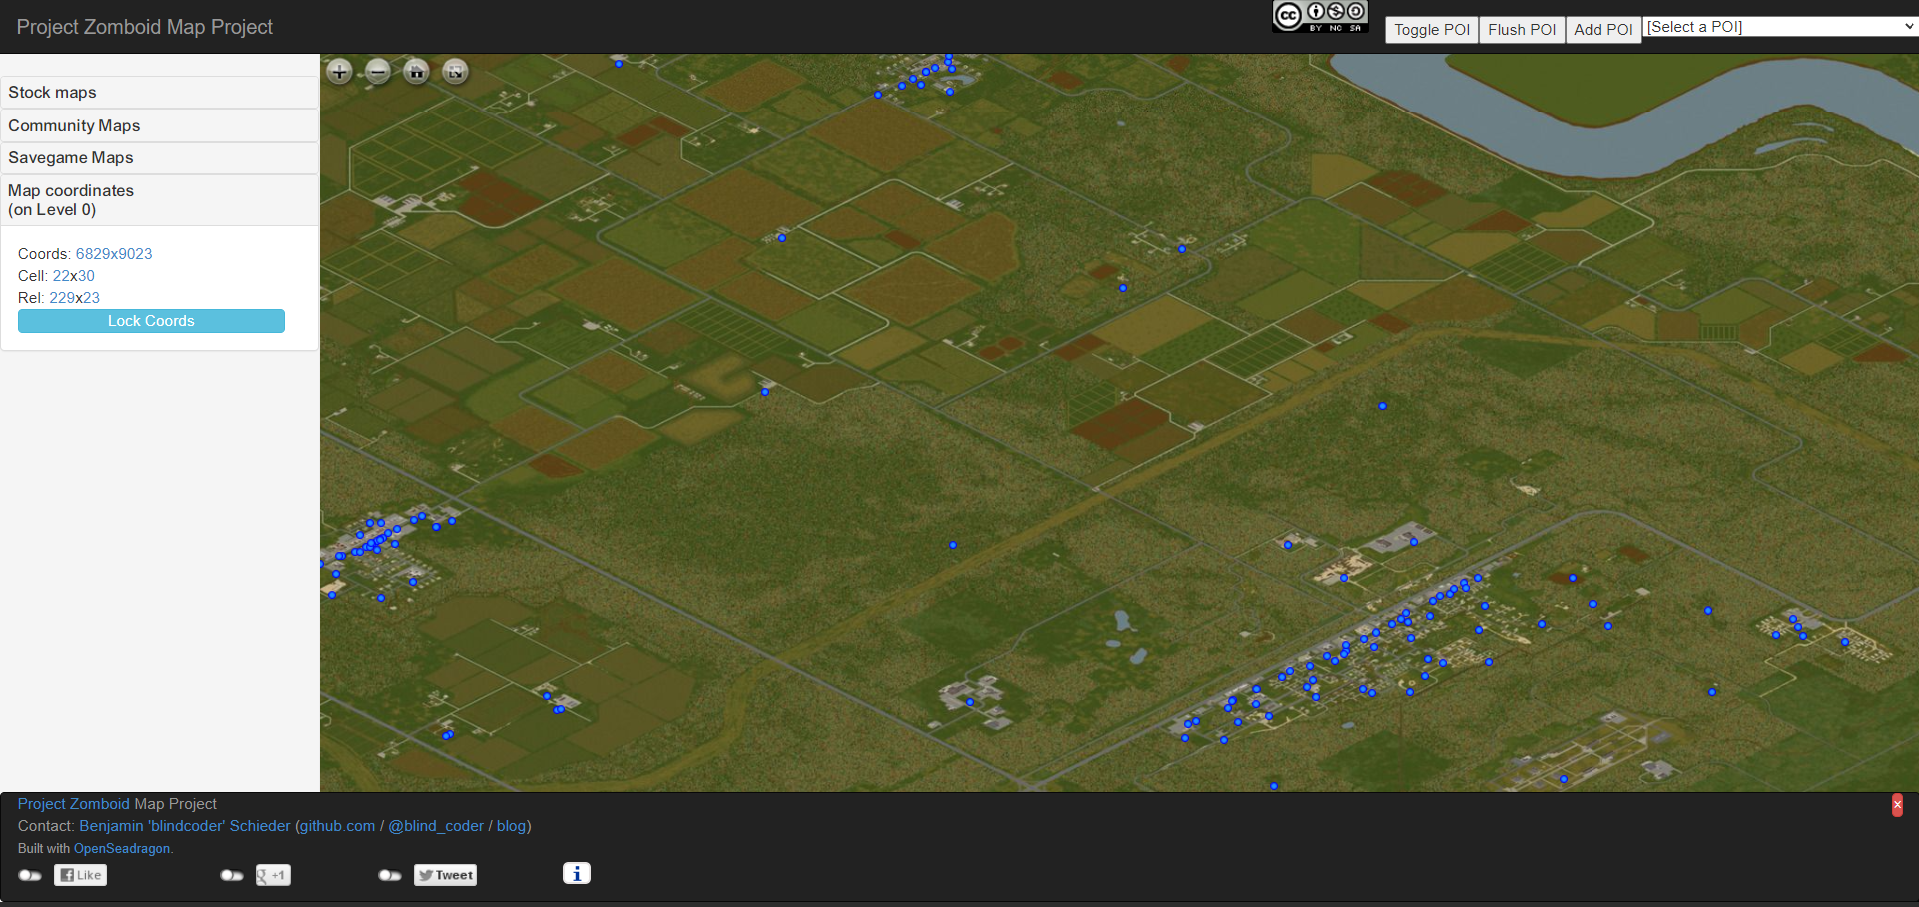
The hard part of SpawnPoint is not the syntax — it’s getting a coordinate that is actually a safe, sensible spot rather than the middle of a horde or inside a wall. Use a community Project Zomboid map for this. There are several mirrors (map.projectzomboid.com is the commonly cited one, and the source guide used pzmap.crash-override.net); pick whichever is current and matches your map build, since the map can shift between builds.
On most of these maps you enable a coordinate-lock toggle (often labeled “Lock Coords”), click the exact spot you want players to spawn, and the map reports a Cell coordinate and a Rel (relative) coordinate — for example Cell 35x31 and Rel 129x12. For the single-line SpawnPoint key you want absolute world coordinates; for the regions file (below) you want the Cell + Rel pair. Pick a tile that’s indoors or in a low-density residential block, away from gun-store and downtown zombie concentrations, so new players get a fighting chance.
You may also see an alternate four-value spawn format in some guides — SpawnPoint=Cx,Cy,Rx,Ry, e.g. 37,31,125,200, mixing cell and relative coordinates. The three-value X,Y,Z form is the dominant, verified one; if you encounter the four-value variant, confirm it against current docs or PZwiki for your specific build before relying on it.
Method 2: A spawn menu with _spawnregions.lua
If you’d rather give players a choice of starting towns — or restrict them to a curated subset of the map — leave SpawnPoint at 0,0,0 and edit servertest_spawnregions.lua. This file lists the regions offered on the spawn-selection screen. Each region entry is a Lua table that uses the Cell + Relative coordinate pair you read off the map:
function SpawnRegions()
    return {
        { name = "Muldraugh, KY", file = "media/maps/Muldraugh, KY/spawnpoints.lua" },
        { name = "Riverside, KY", file = "media/maps/Riverside, KY/spawnpoints.lua" },
        { name = "Custom Camp", serverfile = "spawnpoints.lua",
          worldX = 35, worldY = 31, posX = 129, posY = 12 },
    }
end
In a region entry, worldX and worldY are the Cell coordinates and posX and posY are the Rel (relative-within-cell) coordinates. So the map readout of Cell 35x31 and Rel 129x12 becomes worldX = 35, worldY = 31, posX = 129, posY = 12. Every region you list appears as a selectable option on the spawn screen, and every region you remove disappears from it. That’s how you’d, say, lock a server to Rosewood-and-Riverside only.
This file is genuine Lua, so syntax matters: keep your commas, braces, and quotes intact. A malformed regions file is a common cause of a server that boots but shows an empty or broken spawn screen. If that happens, your _DebugLog-server.txt is the place to look — see our guide on how to read Project Zomboid server logs for which file catches Lua errors.
Single forced spawn vs. multi-region: which to use
| Goal | Use | Where |
|---|---|---|
| Everyone starts at one fixed spot (RP, hardcore, events) | SpawnPoint=X,Y,Z | servertest.ini |
| Players pick from a menu of towns | Region entries (worldX/worldY/posX/posY) | servertest_spawnregions.lua |
| Restrict the menu to a subset of towns | Remove unwanted region entries | servertest_spawnregions.lua |
| Default behavior (all stock cities) | Leave SpawnPoint=0,0,0 | Both files untouched |
Remember the override rule: a non-zero SpawnPoint beats the regions file every time. If you’ve edited _spawnregions.lua but players still all land in the same place, the first thing to check is that SpawnPoint is back at 0,0,0.
Build 42 considerations for spawning
If you’re running on the Build 42 unstable branch (as of mid-2026), the spawn-point mechanics themselves are unchanged — same SpawnPoint key, same regions file, same coordinate model. What has changed is the map underneath them. Knox County was expanded westward in B42 with new towns including Brandenburg, Ekron, and Irvington, so coordinates and region lists tuned for a B41 map may point somewhere different on a B42 world. Always read your coordinates off a map mirror that matches your build.
Two other B42 facts worth keeping in mind: B42 added procedurally generated basements and taller buildings (a new vertical layer), so the Z height value matters more than it used to if you’re placing a spawn in a multi-floor structure; and B42 saves are not compatible with B41 — there’s no official converter, so don’t migrate a world across builds expecting your spawn config to “just work.” B42 also runs heavier on RAM, so plan more headroom than a B41 box. For a fuller breakdown, see the dedicated Build 42 guide.
Setting it up from scratch (no server yet?)
The servertest* files don’t exist until a server has been created and run once. If you’re starting clean, the dedicated server installs anonymously through SteamCMD using app ID 380870 (the game itself is app ID 108600). After install you launch it with StartServer64.bat on Windows or start-server.sh on Linux; the first run prompts you to set the admin account password in the console. Only after that initial boot will the config files appear in Zomboid/Server/ for you to edit. Our walkthrough on creating a Project Zomboid dedicated server covers this in full, including the -Xmx RAM flag in the start script.
Don’t want to wrestle with SteamCMD, port forwarding (default game port is 16261/UDP), and JVM flags at all? Spin up a managed Project Zomboid server with XGamingServer and the config files are generated for you — you just edit SpawnPoint or the regions file in the panel and hit restart.
A safety note on coordinates and characters
Changing SpawnPoint is non-destructive — it doesn’t touch any saved world or character. But two adjacent admin tasks are destructive, and people often reach for them in the same session, so be careful. First, if a bad coordinate strands a player in a wall or unreachable spot and their character bugs out, resetting that one character means editing a live SQLite database. Multiplayer saves live in Zomboid/Saves/Multiplayer/, and per-player rows are in players.db in the NetworkPlayers table.
Always stop the server and back up players.db before touching it. Deleting the wrong row is permanent and there is no undo — a reset zeroes that character and cannot recover the pre-break state. The full safe procedure (using DB Browser for SQLite, deleting only the one row, writing changes) is in our guide on resetting a broken character without affecting other players. Second, if your server is open (Open=true) versus whitelist-only (Open=false), that affects who can even reach your custom spawn — worth confirming before you go public.
Frequently asked questions
What does SpawnPoint=0,0,0 mean in Project Zomboid?
0,0,0 is the default and it’s a sentinel value that tells the server to ignore the setting entirely. With it in place, players see the normal spawn-selection screen and choose a starting city from the available regions. Setting any non-zero X,Y,Z instead forces every player to that single coordinate and removes the choice.
What does the third number (Z) in SpawnPoint control?
The Z value is height. 0 spawns players on the ground floor and 1 spawns them on the second floor of whatever structure occupies that tile. For almost all servers you want 0; only set 1 if you’ve deliberately chosen a multi-story building as your spawn and want players to start upstairs. Build 42’s taller buildings make Z more relevant than it was in older builds.
How do I find spawn coordinates for Project Zomboid?
Use a community Project Zomboid map (such as map.projectzomboid.com or pzmap.crash-override.net — use whichever mirror matches your current build). Enable the coordinate-lock toggle, click the exact tile you want, and read off the Cell and Rel values, e.g. Cell 35x31 and Rel 129x12. Cell maps to worldX/worldY and Rel maps to posX/posY in the regions file. Pick a spot indoors and away from downtown so new players aren’t immediately overwhelmed.
How do I set up multiple spawn cities for players to choose from?
Leave SpawnPoint at 0,0,0 and edit servertest_spawnregions.lua. Each region you list becomes a selectable option on the spawn screen, using { worldX = 35, worldY = 31, posX = 129, posY = 12 }-style entries where worldX/worldY are the Cell coordinates and posX/posY are the relative coordinates. Add a region to offer it; remove a region to hide it. Keep the Lua syntax valid or the spawn screen can break.
My spawn point change isn’t working — what should I check?
First, confirm you edited the right file — servertest.ini for a single forced spawn, servertest_spawnregions.lua for the menu — in Zomboid/Server/. Second, remember a non-zero SpawnPoint overrides the regions file, so if region selection isn’t appearing, reset SpawnPoint to 0,0,0. Third, apply the change: restart the server or run reloadoptions in the console, then verify with showoptions. Existing characters won’t be moved — the change only affects new spawns. If the server logs a Lua error on boot, check _DebugLog-server.txt for a syntax mistake in the regions file.
Does setting a spawn point delete or reset existing characters?
No. Editing SpawnPoint or the regions file is non-destructive — it changes where players spawn going forward and leaves saved worlds and characters untouched. Only manual database edits to players.db (in Zomboid/Saves/Multiplayer/) reset characters, and those should always be done with the server stopped and a backup of the file made first.
Ready to play?
Run your own Project Zomboid server with XGamingServer
Spin up an always-on Project Zomboid server your friends can join in minutes — no port-forwarding, no tech headaches.