Have you come across a killer 7D2D mod and you have no idea how to install it. Then you have come to the right place. Here. I will show you how to install 7 days to Die mods on your local machine as well as on a 7D2D server.
But first before we get into the nitty gritty of installing 7d2d mods.
What are 7D2D Mods?
A mod (short for “modification”) is an alteration by players or fans of a video game that changes one or more aspects of a video game, such as how it looks or behaves. Mods may range from small changes and tweaks to complete overhauls, and can extend the replay value and interest of the game.
Over time, modded version of games has become so popular that the original version of the game is often referred to as plain vanilla this is most common with Minecraft.
Popular sites in which you can find mods include Nexus Mods, Mod_DB, Steam Workshop and also the 7d2d Community page.
How to install 7D2D mods on a gaming server
Running you game on our 7d2d game server? the installation steps are the same as installing on a local computer. Below I have detailed how to install mods on xgamingserver panel.
1.Login to your game panel and tunr off your server
After you place a order of free trial you’ll be sent login details to your server control panel.
2. Go to File manager

On your 7 days to die server, navigate to the file manager Tab tab then file management. here you’ll see the game files.
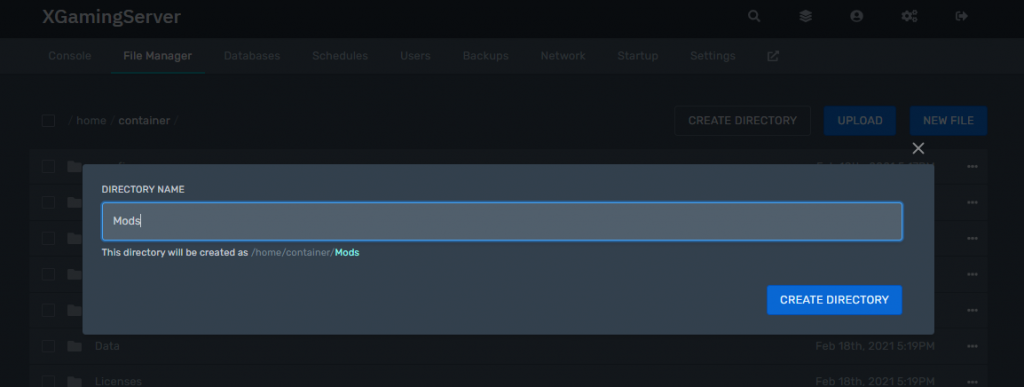
3. Create folder and upload mods.
You can create a folder called Mods
4. Download and install sFTP client and launch it
Install an sFTP client such as WinSCP
Head on to your panel and settings. Launch sftp


This way you can upload all your data to the Valheim server and the password you used on your game panel

You can now drag and drop your Mods into the folder you created
and congratulations you have just installed mod on your 7d2d server.
Note:
It is better to note that the game mods come with installation instructions. Please read them carefully.
Some mods will require EAC to the turned off. Please read this guide to help you out.
Reboot and enjoy your game.
Bonus
How to install 7D2D mods on PC
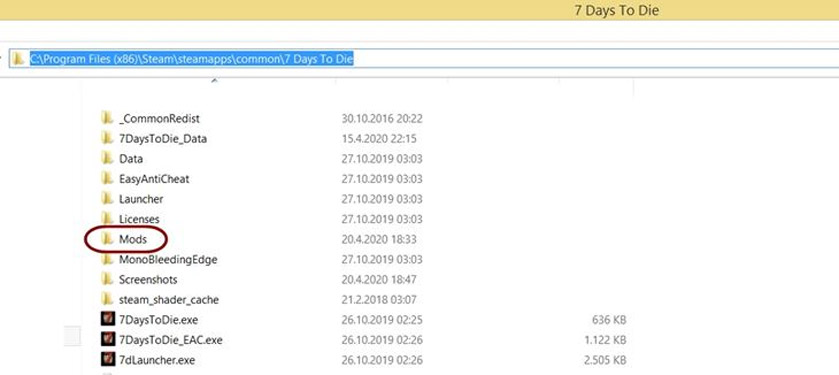
1.Create a “Mods” Folder
We need to create a “Mods” folder in the directory where the game is installed. We will put the downloaded mods in this folder.
For example, if you are a Steam user, you will create the “Mods” folder here:
C:\Program Files (x86)\Steam\steamapps\common\7 Days To Die
2. Download the Mod you’d like to install
Get the mod you like from the websites mentioned above
3. Extract the Mod and put It to the “Mods” Folder you created
Extract the archived mod file. Then choose the correct folder you need to use. The correct folder contains the “ModInfo.xml” file.
Run and enjoy your moded game.

Ready to play?
Run your own 7 Days to Die server with XGamingServer
Spin up an always-on 7 Days to Die server your friends can join in minutes — no port-forwarding, no tech headaches.