If you run a Project Zomboid dedicated server, almost everything you care about lives in three plain files inside one folder. The most important of them is servertest.ini, the master config that controls networking, your player cap, PVP, passwords, the public listing, your mod lists, spawn behavior, and RCON. This guide breaks down every key that matters, shows you how to apply changes live without a restart, and explains how servertest.ini works alongside its two Lua siblings. We also flag exactly where Build 41 and Build 42 behave differently, so you don’t copy a setting that no longer applies.
Build 41 vs Build 42: read this first
Before touching a single config key, know which build you are on, because it changes what’s true. As of mid-2026, Build 41 (B41.78) is still the stable, default branch on Steam and is what most servers run. Build 42 has been on the opt-in “unstable” beta branch since December 2024; the latest unstable release in our sources is Build 42.17.0 (around April 20, 2026). Press coverage describes the stable launch as close, but it has not been confirmed shipped, so don’t assume B42 is your default unless you deliberately switched branches.
One critical detail for server operators: multiplayer was absent from Build 42 at first launch and only joined the unstable branch around December 2025 (roughly v42.13). That means any B42 dedicated-server tutorial from 2024 or early 2025 is unreliable for multiplayer. The good news is that the things this guide centers on — the three-file config model, the Zomboid/Server/ layout, admin commands, the whitelist, and the Workshop two-key system — are the same across B41 and B42 in every source we reviewed.
| Topic | Build 41 | Build 42 (unstable, mid-2026) |
|---|---|---|
| Map | Knox County (Muldraugh, West Point, Rosewood, Riverside, Louisville) | Knox County expanded westward; new towns like Brandenburg, Ekron, Irvington |
| Verticality | No basements, limited height | Procedurally generated basements and taller buildings |
| Crafting | Original system | Rebuilt from the ground up; renewable crafting and animal products |
| Sandbox keys | Original SandboxVars set | New SandboxVars for animals, basements, darkness (Lua entries, not new .ini keys) |
| Save compatibility | — | B42 saves are NOT compatible with B41; no official converter |
| RAM | Lighter | Heavier — plan more headroom |
Throughout this guide, when a value is build-specific I’ll hedge it. When it’s stable and long-standing, treat it as B41 behavior that carries forward into B42. If you want a deeper tour of what changed in the new build, our Build 42 overview covers the map expansion and crafting rework in detail.
The three config files in Zomboid/Server/
A dedicated server is configured by files inside the user’s Zomboid/Server/ folder. On Windows that’s C:\Users\. The default server name is servertest, which is why the files are all named servertest*. If you ever rename your server, these filenames change to match.
| File | What it controls |
|---|---|
servertest.ini | Main server settings: networking and ports, player cap, PVP, passwords, public listing, mod lists, map, spawn point, RCON, anti-cheat. Edit in any text editor. |
servertest_SandboxVars.lua | The world ruleset: zombie population, loot rates, XP multipliers, day length, and (in B42) animal, basement, and darkness settings. |
servertest_spawnregions.lua | The cities and regions offered on the spawn-selection screen. |
PZwiki also lists a servertest_spawnpoints.lua alongside these, so you may see four files in practice. A clean mental model is: the .ini file controls the server software and connection, the SandboxVars.lua file controls the difficulty and feel of the world, and the spawn-related Lua files control where survivors begin. You can verify any live setting with the admin command showoptions, and after editing servertest.ini while the server is running you apply changes with reloadoptions — no full restart required for most options.
Key servertest.ini settings explained
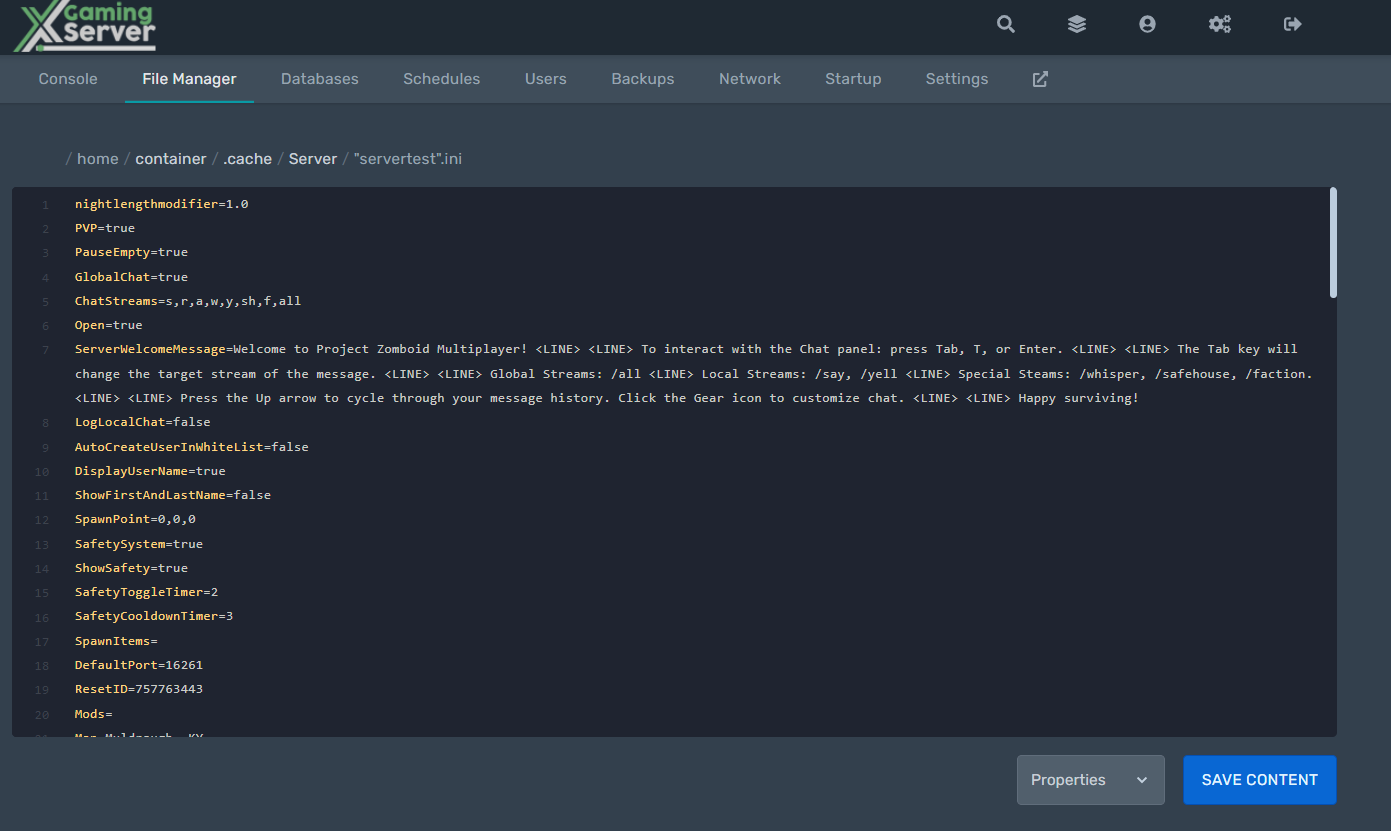
Here are the keys that matter most, with their confirmed shipped defaults where known. Edit values, save the file, then run reloadoptions in the console to apply them.
Access and visibility
PVP=true— ships enabled. Toggles player-vs-player combat across the server.Open=true— if true, anyone may join and an account is auto-created on first connect. If false, the server is whitelist-only. This single key is your master switch for the whitelist (covered below).PauseEmpty=true— pauses world time when no players are online, so the apocalypse doesn’t advance on an empty server.Public=false— whether the server appears in the in-game public browser. Set true to be listed.PublicName— the name shown in the public browser.PublicDescription— optional description in the browser (empty by default).server_browser_announced_ip— the public IP advertised to the browser (empty by default).SafetySystem=true— ships enabled. The PVP “safety” toggle system that lets players flag whether they can be hit.
Players, passwords, and ports
MaxPlayers=64— the Project Zomboid default cap is 64, though most real servers set something lower like 16 or 32 to match their hardware. Be conservative; PZ is CPU-heavy with many players.DefaultPort=16261— the primary game port, UDP. This is the one you must forward.Password— a server-wide join password, empty by default. This is separate from per-account passwords.
A common point of confusion is the second UDP port. Project Zomboid uses a companion port at DefaultPort + 1 (so 16262), assigned automatically. Build 41.65 and later retired the old per-player port range, so in practice only 16261/UDP needs forwarding. A standalone UDPPort= line was not present in the real config we reviewed, so treat any guide that tells you to set one as outdated and confirm against current docs.
Mods and map
WorkshopItems— semicolon-separated numeric Steam Workshop IDs. Tells the server what to download.Mods— semicolon-separated internal mod IDs (text identifiers, not display names). Tells the server what to activate. Load order is left-to-right.Map— a comma-separated load list of maps and map-mods, defaulting to Muldraugh, KY. Confirm the exact default string for your build.SpawnPoint=0,0,0—0,0,0means “ignored,” so players pick a city; any non-zero value forces all players to a fixed coordinate.
Anti-cheat and RCON
One thing that surprises people editing the file by hand: anti-cheat is not a single switch. The real config contains a whole family of keys, AntiCheatProtectionType1 through AntiCheatProtectionType24, each independently set to true or false. If you’re chasing a false-positive kick, you’ll be toggling a specific numbered type, not one global option. The server logs map types to meanings (for example “Type 12 = Lua Checksum Mismatch”).
RCONPort=27015— the RCON listen port in the real config we reviewed; some host templates use 12345 instead.RCONPassword— empty by default, which means RCON is disabled until you set one.
You may also see a GlobalChat key referenced by host guides for the server-wide chat channel. We couldn’t verify its default against a primary source, so set it deliberately rather than assuming a value.
Applying changes live: showoptions and reloadoptions
You don’t have to restart to change most settings. Edit servertest.ini, save it, then in the server console (or via RCON, no slash prefix) run:
showoptions
reloadoptions
showoptions prints the current live values so you can confirm what the running server actually believes, which is invaluable when a change doesn’t seem to take. reloadoptions re-reads the file and applies it on the fly. A few settings (notably ones tied to the world or active mod set) still want a clean restart, but for tuning PVP, player cap, passwords, and messages this loop saves you a lot of downtime.
Creating the dedicated server and where files live
If you’re standing up the server yourself, install it through SteamCMD using the dedicated-server App ID 380870 (the game itself is App ID 108600). Install anonymously:
steamcmd +login anonymous +app_update 380870 validate +quitLaunch with StartServer64.bat on 64-bit Windows or start-server.sh on Linux. On the very first run the console prompts you for an admin password — this becomes the password for the built-in admin account, so set something strong and remember it. The server writes its files into the user Zomboid/ folder: Server/ for configs, Saves/ for worlds, and Logs/ for archived logs. To allocate RAM, edit the -Xmx JVM flag in the start script (for example -Xmx8g); remember that B42 wants more headroom than B41. For a full walkthrough, see our guide on creating a Project Zomboid dedicated server. If you’d rather skip the setup entirely, our managed Project Zomboid hosting plans hand you a configured panel and handle ports and updates for you.
Spawn points and spawn regions
There are two layers to spawning. The simplest is SpawnPoint in servertest.ini, which uses the format SpawnPoint=X,Y,Z in world coordinates. The default 0,0,0 is ignored, letting players choose a spawn city. Set a non-zero value and every player spawns there. The third value is height: 0 for ground level, 1 for a second floor. For example:
SpawnPoint=10629,9312,0The second layer is servertest_spawnregions.lua, which lists the cities offered on the spawn screen. Each region entry uses Cell plus Relative coordinates, like { worldX = 35, worldY = 31, posX = 129, posY = 12 }, where worldX/worldY are the Cell coordinates and posX/posY are the Relative coordinates. To find coordinates, use a community Project Zomboid map (several mirrors exist, such as map.projectzomboid.com); use its “Lock Coords” mode, click a spot, and read off the Cell and Rel values. For a single fixed spawn, just set SpawnPoint directly — it’s the simplest route. For selectable multi-region control, edit the regions Lua file. Our dedicated walkthrough on setting up spawn points goes step by step. Note that some guides show an alternate four-value form (SpawnPoint=Cx,Cy,Rx,Ry); the three-value X,Y,Z form is the dominant, verified one, so prefer it and confirm any four-value variant against your build.
The Steam Workshop two-key system
This is the single biggest mod gotcha, so it’s worth slowing down. Adding a Workshop mod requires two separate keys in servertest.ini, and forgetting either one is why mods “don’t load.”
WorkshopItemstakes the numeric Workshop IDs (the number in the Workshop URL), semicolon-separated. This tells the server what to download.Modstakes the internal text Mod IDs — not the display names. One Workshop item can contain several Mod IDs. This tells the server what to activate.
WorkshopItems=624489512;972954692;670807387
Mods=CraftableAxes;Katana;MREMeal;NecroForge
A Workshop ID is the download package (numeric); a Mod ID is the activatable mod inside it (text). Both are required: a Workshop ID alone downloads but never loads, and a Mod ID alone won’t download anything. Load order is the left-to-right order in Mods=, so later entries can override earlier ones — useful for patch mods. The server auto-downloads everything in WorkshopItems on startup. Our step-by-step on installing Steam Workshop mods covers finding both IDs for each mod.
The whitelist: Open=true vs Open=false
The whitelist is governed entirely by the Open key. With Open=true the server is open: any client may join, and an account (username plus password) is auto-created on first join and stored in the player database. With Open=false the server is whitelist-only: admins pre-create accounts and unknown users can’t connect.
To add a whitelisted account, use /adduser . There’s a command to remove an account from the whitelist as well — commonly written as /removeuserfromwhitelist or /removeuser, so confirm the exact spelling against PZwiki for your build. A handy pattern when converting a previously-open server to whitelist-only is to flip Open to false and convert everyone currently connected into whitelist accounts in one shot (a command often listed as /addalltowhitelist — verify before relying on it). Remember that these per-account passwords are distinct from the server-wide Password= join password. Full details are in our whitelist setup guide.
Admin commands you’ll actually use
Admin commands run three ways: in in-game chat with a / prefix (you need admin status), in the server console with no prefix, or over RCON with no prefix. Run /help for the full list and /help for one. Access levels, highest to lowest, are admin, moderator, overseer, gm, observer.
/setaccesslevel— set access level; usenoneto remove./additem— give an item, e.g.Module.Item [count] Base.Axe; omit the user to give to yourself./addxp— grant XP.Perks.Skill /teleportand/teleportto x,y,z— move players./godmodeand/invisible— toggle damage immunity / invisibility to zombies./kick,[reason] /banid,true /banuser, plustrue /unbanidand/unbanuser./save— force a world save;/servermsg "msg"— broadcast to everyone./addvehicle, and world togglesBase.Vehicle /checkfire,/startrain,/stoprain,/chopper,/alarm.
Other commands you’ll see in PZ lists — /grantadmin, /removeadmin, /noclip, /voiceban, /changeoption, /players, /quit — are plausible but we didn’t verify each verbatim here, so check exact syntax on PZwiki before relying on them. The full breakdown lives in our admin commands reference, and the official Project Zomboid documentation covers panel-specific workflows.
Resetting a broken character (destructive — back up first)
Sometimes a single character’s save corrupts and the player can’t load in. You can reset just that one character without touching anyone else, but this is a destructive database edit, so handle it carefully. Multiplayer saves live in Zomboid/Saves/Multiplayer/, and per-player data sits in the SQLite database players.db inside that folder, in the table NetworkPlayers (one row per character).
- Stop the server and back up
players.dbbefore anything else. - Open
players.dbin DB Browser for SQLite, go to Browse Data, and select theNetworkPlayerstable. - Find the broken player’s row, select the whole row, delete only that one row, then Write Changes and replace the file.
- The world, other players, and all map data are untouched; that player creates a fresh character on next join.
Be clear-eyed about what this does: it zeroes the character and cannot recover the pre-break state. Always back up the file and stop the server first, because deleting the wrong row in a live database is unrecoverable. Our full broken-character reset walkthrough shows the exact DB Browser screens.
Reading the logs when something breaks
When a mod fails or the server won’t start, the logs tell you why. Live output goes to server-console.txt in the Zomboid/ folder (the same level as Server/) — that’s the running stdout, including startup, mod loading, and player connects. On restart, prior logs are moved into Zomboid/Logs/, timestamped and often zipped. The most useful file for mod crashes is *_DebugLog-server.txt, which holds Lua errors and stack traces; a mod ID near an error usually points straight at the culprit, which you then remove from Mods=. For moderation, *_chat.txt and *_pvp.txt record chat and player-on-player damage. Our guide on checking server logs maps every log type to the problem it solves.
Frequently asked questions
Where is servertest.ini located?
It lives in the user Zomboid/Server/ folder — on Windows, C:\Users\. The “servertest” prefix is the default server name, so if you renamed your server the file will carry that name instead. The two Lua siblings, servertest_SandboxVars.lua and servertest_spawnregions.lua, sit in the same folder.
What is the default Project Zomboid server port?
The primary game port is DefaultPort=16261 over UDP, and that’s the one to forward. There’s a companion port at DefaultPort + 1 (16262) assigned automatically. Since Build 41.65 retired the old per-player port range, effectively only 16261/UDP matters for connectivity. If you also use RCON, open the RCON port separately — the config we reviewed used 27015, though some hosts default to 12345.
How do I apply config changes without restarting?
Edit servertest.ini, save it, and run reloadoptions in the server console (or over RCON). Use showoptions first to print the current live values so you can confirm what the running server is using. Most settings — PVP, player cap, passwords, broadcast messages — reload cleanly. World- and mod-set-level changes still want a full restart.
Why won’t my Workshop mods load?
Almost always because you set only one of the two required keys. WorkshopItems= needs the numeric Workshop IDs to download the packages, and Mods= needs the internal text Mod IDs to actually activate them. A Workshop ID alone downloads but never loads; a Mod ID alone has nothing to load from. Set both, semicolon-separated, and check server-console.txt or the latest DebugLog-server.txt for the exact Mod IDs the server detected.
What’s the difference between Open and the whitelist?
They’re the same setting. Open=true means an open server where accounts auto-create on first join; Open=false means whitelist-only, where you pre-create accounts with /adduser . The per-account password each player gets is different from the server-wide Password= join password, which gates the whole server regardless of whitelist mode.
Is Build 42 config different from Build 41?
The structure is the same: the same three-file model, the same Zomboid/Server/ location, the same admin commands, whitelist, and Workshop two-key system. What differs in B42 is mostly inside SandboxVars.lua — new entries for animals, basements, and darkness — plus a heavier RAM footprint and an expanded map. Crucially, B42 saves are not compatible with B41 and there’s no official converter, so don’t move a world between branches. As of mid-2026, B41 is still the stable default and B42 remains an opt-in unstable branch.
Ready to play?
Run your own Project Zomboid server with XGamingServer
Spin up an always-on Project Zomboid server your friends can join in minutes — no port-forwarding, no tech headaches.