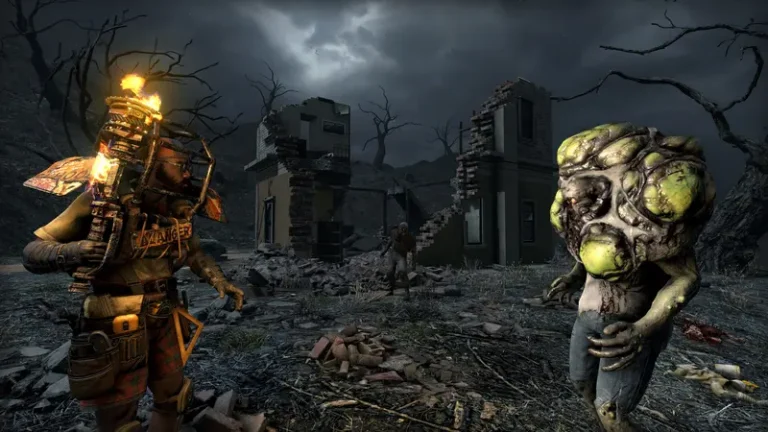
The zombies in 7 Days to Die are not all created equal. For your first few in-game days the shambling masses feel slow and almost harmless, but the moment a Blood Moon escalates or you push into a higher-tier biome, the special infected arrive — and a single misplayed encounter can level your base or kill you outright. Knowing exactly what each special zombie does, how to identify it, and the one rule that keeps you alive against it is the difference between surviving the seventh night and respawning in your underpants. This guide breaks down every special infected, the feral and radiated trait overlays that make them deadlier, the new enemies added on the PC 2.x line, and the important caveats about what the modern Console Edition does and does not currently include.
Quick version note before we dive in: 7 Days to Die left Early Access with the 1.0 release on July 25, 2024, unifying a single build across PC, PS5 and Xbox Series X|S. Since then the game has progressed through the 2.x line — 2.0 “Storm’s Brewing” went stable June 30, 2025, and the current branch in mid-2026 is roughly 2.6. The special-zombie roster covered here exists on both the PC 1.0 base and the modern Console Edition; the brand-new enemies introduced in 2.0 are PC 2.x content that the Console Edition may not yet have, which we flag clearly throughout.
The Two Trait Overlays: Feral and Radiated
Before the individual special zombies, you need to understand the two “trait” layers, because nearly any zombie type — basic or special — can spawn with one of them. These overlays are your single most important visual cue, and they communicate threat level at a glance through eye and body glow.
- Feral (glowing yellow eyes): A feral zombie is the same model as its base version but considerably more dangerous — increased speed, increased damage, more health, and notable knockback resistance, meaning you can’t reliably stagger it back the way you can a normal walker. Feral zombies start appearing as your Game Stage climbs and become common during Blood Moons.
- Radiated (glowing green body): The top-tier overlay. A radiated zombie is even tougher than a feral one and, critically, can regenerate health — if you don’t apply sustained damage you may watch a wounded radiated zombie heal back up. The green glow is your warning to commit hard burst damage rather than chipping away. Radiated is the highest-difficulty layer applied to many zombie types, including the specials below.
The appearance of feral and radiated zombies is driven by your hidden Game Stage, a value that rises with your player level, the number of days you’ve survived, and your zombie kill count. The commonly cited community approximation of “player level + kills/10 + days×0.5” is just that — an approximation that varies by version — but the direction is reliable: the longer and harder you play, the more yellow- and green-eyed horrors your world produces.
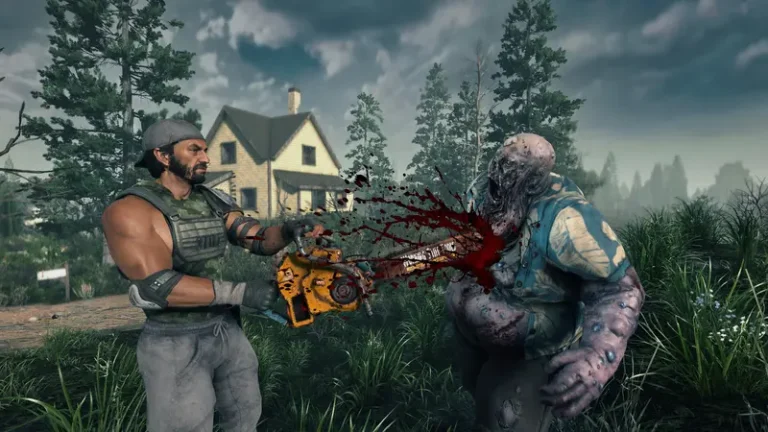
The Cop (Infected Police Officer): Acid Spit and a Death Explosion
The Cop is a bloated, armored former police officer and one of the first specials new players learn to fear — for two separate reasons. At range, the Cop projectile-vomits a corrosive acid/bile spit that damages you and degrades equipment, so it punishes you for standing still in the open. Up close it is far worse: when killed at close range or brought to critical health, the Cop explodes in a bile burst as a suicide attack.
The takeaway is simple but life-saving: never be standing right next to a Cop when it dies. Kill it from a few blocks away, or back off the instant its health drops low, so the explosion catches air instead of your face. During a Blood Moon, Cops mixed into a tight horde can chain-damage your defensive structures, so account for them when you plan your kill corridor.
The Spider Zombie: Climbs Walls and Leaps
The Spider Zombie crawls on all fours and is the enemy that breaks naive base designs. Unlike standard zombies that have to path along the ground and dig toward you, the Spider climbs walls and leaps across gaps, and it gets faster after dark. If your base relies purely on a high wall with no overhang, the Spider is the type that scales straight up it and drops onto your platform. Treat it as an agile flanker: design with overhangs, gaps it can’t bridge, and elevated firing positions, and keep an eye upward, not just down your funnel.
The Demolisher: Hit Anywhere EXCEPT the Chest Charge
The Demolisher is the single most important special to understand mechanically, because the obvious play is the catastrophic one. It is a large, extremely tanky zombie that hits hard, and it carries a green explosive charge on its chest. Here is the trap: if that chest charge is struck directly, it turns red, beeps, and then detonates — a blast capable of dealing roughly 800 damage to entities, around 5,000 to blocks, across an approximately 5-block radius. During a Blood Moon, a single triggered Demolisher can blow a hole clean through a base wall and let the rest of the horde pour in.
The correct strategy is counterintuitive: kill the Demolisher by hitting it anywhere except the chest charge — head, limbs, body — and it can be killed without ever exploding. Do not try to “shoot the bomb to end it quickly”; that is exactly what arms and triggers the detonation. If you must use the explosion (for example, to clear a clogged horde), do it on your terms, away from your structural blocks. Master the headshot-over-chestshot discipline and the Demolisher becomes manageable instead of base-ending.
The Screamer: Heat-Spawned Horde Caller
The Screamer (sometimes called the Cop-screamer or feral screamer) is unique because you summon her through your own activity. Screamers spawn where Heat is high — and Heat is generated by crafting, running forges, and firing guns. When a Screamer spots you, she screams to summon a horde of additional zombies to her location. Ignore her and you’ll quickly find yourself fighting a wandering horde you never intended to provoke.
Two rules: kill Screamers fast — before the scream finishes and reinforcements arrive — and manage your base’s Heat footprint so they spawn less often in the first place. Spreading out noisy stations, not running every forge at once, and keeping suppressed weapons handy all reduce the Heat that draws her in. Heat management ties directly into base defense, which we cover in more depth in our Blood Moon horde strategy guide.
Flying, Pack, and Beast Specials: Vulture, Dog, and Bear
Zombie Vulture
The Zombie Vulture is the game’s flying threat. It attacks from above — most notoriously while you’re driving a vehicle or caught out in the open — strikes, then backs off to avoid retaliation, making it frustrating to land hits on. Vultures are a constant harassment on long overland trips, so keep a fast, accurate weapon (or simply keep moving and tank the chip damage) when crossing exposed terrain.
Zombie Dog
The Zombie Dog is a fast pack hunter and, crucially, is not slowed by daylight the way some shambling zombies are — it’s dangerous at any hour. Dogs travel in groups and close distance alarmingly fast, so they overwhelm players who are used to kiting slow walkers. They appear in wandering hordes and Blood Moons alike; treat any dog sighting as “expect more than one.”
Zombie Bear
The Zombie Bear is a blood-covered, far more dangerous version of the normal wildlife bear, with substantially more health and damage and aggression on sight. It is a serious threat even outside of horde nights — stumbling into one while under-geared in a tougher biome is a classic early-death scenario. Have an escape route or heavy firepower before you engage.
Special Infected at a Glance
| Special zombie | Signature threat | The rule that keeps you alive |
|---|---|---|
| Cop | Ranged acid/bile spit; explodes on death at close range | Never be adjacent when it dies — kill from range or back off |
| Spider | Climbs walls, leaps gaps, faster after dark | Design with overhangs/gaps; watch upward, not just your funnel |
| Demolisher | Chest charge detonates (~800 entity / ~5000 block dmg, ~5-block radius) | Hit anywhere EXCEPT the chest charge; never shoot the bomb |
| Screamer | Heat-spawned; screams to summon a horde | Kill fast; manage base Heat to reduce spawns |
| Vulture | Flying; strikes from above then retreats | Fast/accurate weapon; expect harassment when driving |
| Zombie Dog | Fast pack hunter, not slowed by daylight | Assume more than one; don’t try to kite on foot |
| Zombie Bear | High health/damage, aggressive on sight | Heavy firepower or an escape route before engaging |
PC 2.x Additions: Plague Spitter, Frost Claw, and Tiered Classes
The 2.0 “Storm’s Brewing” update (stable June 30, 2025) expanded the roster alongside its new biome-progression hazards and Dynamic Storm system. These additions are PC 2.x content and may be absent from the Console Edition depending on its current patch level — verify before assuming they’re present on console:
- Plague Spitter — a new spitting-type zombie introduced in 2.0 (PC).
- Frost Claw — a new 2.0 enemy tied to the elemental-hazard theme (PC).
- Charged Blue — a higher-tier zombie class added in 2.0 (PC).
- Infernal Orange — another higher-tier zombie class added in 2.0 (PC).
If you’re running a PC server on the 2.x branch, these enemies are part of the experience and add new wrinkles to horde nights and biome travel. If you or your players are on the modern Console Edition, treat the special-infected roster as the 1.0-era base set (Cop, Spider, Demolisher, Screamer, Vulture, Dog, Bear, plus feral and radiated overlays) and confirm whether your console build has caught up to PC’s 2.x content before promising the newer enemies.
PC vs Console Edition: What You Actually Get
This deserves its own section because it’s the most common source of confusion. The modern Console Edition — published by The Fun Pimps on PS5 and Xbox Series X|S — launched on July 25, 2024 on the 1.0 content base, simultaneously with PC 1.0, and received crossplay in the 1.2 update of December 2024. It is completely distinct from the old 2016 Telltale legacy console version (PS4/Xbox One), which is no longer developed and receives no updates — do not conflate the two.
Historically, the Console Edition has lagged PC by a patch or two. A third-party roadmap claims 2.6 shipped to PC, PS5 and Xbox simultaneously in April 2026 with full parity, but that simultaneous/full-parity claim is unconfirmed against official sources. The safe framing: the Console Edition is built on the 1.0-era base and is catching up to PC’s 2.x content, so verify your console’s exact patch level before assuming it has the 2.0 zombies or the biome-progression hazard system. If you run servers, you’ll also want to understand the per-version weapon picture, which we cover in our guide to weaponry in the 7 Days to Die Console Edition.
When the Specials Come Out: Game Stage and the Blood Moon
Special zombies don’t appear at random — their frequency scales with your Game Stage and peaks during the Blood Moon Horde. By default, a Blood Moon occurs every 7th day, running from 22:00 to 04:00 the next morning, and the horde arrives in escalating waves through the night. The higher your Game Stage, the more feral and radiated zombies, Cops, and Demolishers populate those waves, with the toughest specials saved for the peak.
On a dedicated server, the timing and intensity are controlled directly in serverconfig.xml. The key properties are BloodMoonFrequency (default 7 days; set 0 to disable hordes entirely), BloodMoonRange (random ± day variance around the frequency), and BloodMoonEnemyCount (default 8, the cap on concurrent zombies alive per player during the horde). Here’s how those look in the config file:
Raising BloodMoonEnemyCount and GameDifficulty (a 0–5 scale, default 2) directly increases how many specials you face and how lethal they are. If you’re tuning a server for a group that wants brutal horde nights, those two values plus the natural Game Stage climb are your main levers.
Building a Base That Survives the Specials
Each special demands a different answer, and a good horde base accounts for all of them at once:
- A kill corridor / fighting position: funnel zombies along a single predictable path so you can concentrate fire and so explosions (Cops, triggered Demolishers) are contained.
- Overhangs and gaps: defeat Spider Zombies that would otherwise climb a flat wall straight up to your firing platform.
- Traps: blade traps and dart traps thin the waves; electric fences stun and slow approaching zombies — useful for buying time against fast Dogs and feral runners.
- Reinforced blocks: use concrete or steel, because zombies dig and pathfind toward you and destroy blocks; weak walls won’t survive a Demolisher or a sustained dig.
- Heat discipline: keep your crafting Heat low so Screamers don’t spawn mid-fight and double the horde.
- A fallback position: always have somewhere to retreat if a Demolisher blows your primary wall.
Many of the late-game defenses — blade traps, dart traps, auto turrets, and the workstations that craft them — are gated behind a key intermediate component, which is why our guide to mechanical parts pairs naturally with horde preparation. And because the toughest specials and largest hordes appear in the more dangerous biomes, where you place your base matters as much as how you build it — our comprehensive biome guide covers the danger-and-loot gradient from the safe Pine Forest up to the deadly Wasteland.
If you want full control over Game Stage scaling, Blood Moon frequency, difficulty, and the ability to run overhaul mods that add or rebalance these special zombies, a dedicated server is the way to do it. You can spin up a managed 7 Days to Die server with instant config access, and our 7 Days to Die documentation walks through the setup end to end.
Frequently Asked Questions
How do I kill a Demolisher without it exploding?
Hit it anywhere except the green explosive charge on its chest — head, limbs, or body all work, and the Demolisher can be killed completely without detonating. The danger is that striking the chest charge directly turns it red, makes it beep, and triggers a blast of roughly 800 damage to entities and around 5,000 to blocks across an approximately 5-block radius. So the rule is the opposite of instinct: don’t “shoot the bomb.” Aim for the head and avoid the chest entirely.
What’s the difference between feral and radiated zombies?
Feral zombies have glowing yellow eyes and are faster, hit harder, have more health, and resist knockback compared to their base versions. Radiated zombies glow green, are tougher still, and — the key difference — can regenerate health, so you need to commit concentrated burst damage rather than chipping away. Radiated is effectively the top-tier overlay applied on top of many zombie types, including specials.
Why does a Screamer keep showing up at my base?
Screamers spawn in response to Heat, which your base generates through crafting, running forges, and firing guns. The more activity (and the more concentrated it is), the more likely a Screamer is to appear. When she spots you she screams to summon a horde, so kill her quickly before reinforcements arrive, and reduce future spawns by spreading out noisy stations, not running every forge simultaneously, and keeping your overall Heat footprint down.
Does the Console Edition have all the special zombies?
The modern Console Edition (PS5 / Xbox Series, launched July 25, 2024 on the 1.0 base) has the core special roster — Cop, Spider, Demolisher, Screamer, Vulture, Dog, Bear, plus the feral and radiated overlays. The newer enemies introduced on the PC 2.x line — Plague Spitter, Frost Claw, Charged Blue, and Infernal Orange — are PC 2.x content and may not yet be on console depending on its current patch level. Console has historically lagged PC by a patch or two, so verify your build before assuming the 2.0 zombies are present. Note this is the modern Console Edition, completely separate from the discontinued 2016 Telltale legacy version.
When do special zombies start appearing?
Special and trait zombies scale with your hidden Game Stage, which rises with your player level, days survived, and zombie kills. The more you play, the more Cops, Demolishers, and feral/radiated zombies appear — especially during the Blood Moon Horde, which by default hits every 7th day from 22:00 to 04:00 and stacks the toughest specials into its peak waves. On a server you can tune this through GameDifficulty, BloodMoonFrequency, and BloodMoonEnemyCount in serverconfig.xml.
Can mods add new zombie types to my server?
Yes. Overhaul mods like Darkness Falls add and rebalance enemies extensively. To run most mods, you’ll need to disable Easy Anti-Cheat on the server by setting serverconfig.xml — players then join via the non-EAC launch option. This is a supported configuration with no ban risk to the server owner, though it removes cheat protection. See our walkthroughs on disabling EAC and the best 7 Days to Die mods to get started.
See every zombie's health & XP: the 7 Days to Die Zombies & Animals Database lists all 190+ enemies with base HP, XP and their Feral/Radiated/Charged/Infernal variants — pulled straight from the game files.
Ready to play?
Run your own 7 Days to Die server with XGamingServer
Spin up an always-on 7 Days to Die server your friends can join in minutes — no port-forwarding, no tech headaches.