Once your Core Keeper dedicated server is up and running, the next hurdle is actually getting your friends into the world. Unlike a lot of survival games that lean entirely on an IP:port for joining, Core Keeper uses a clever relay-based system built around a unique Game ID. That Game ID is the primary, recommended way to connect, and it works through most home routers without any port forwarding at all. There’s also a direct IP method for hosts that support it. This guide walks through both, plus the configuration that controls who can join and which world loads.
If you don’t have a server yet, or you’re tired of fighting with port forwarding and SteamCMD updates on a home box, our managed Core Keeper server hosting generates the Game ID for you and exposes it directly in the panel. For deeper setup walkthroughs, the Core Keeper documentation covers installation and file management step by step.
The two ways to connect to a Core Keeper server
Core Keeper gives players two distinct join paths. Understanding the difference up front saves a lot of confusion, because they behave very differently with respect to networking and NAT.
- Game ID (primary, recommended): A unique, auto-generated string printed in the server console at startup. Players paste it into the Join Game screen. This uses the same relay mechanism as normal player-hosted co-op, so it is NAT-friendly and usually works without port forwarding.
- Direct IP:port (alternative, host-dependent): A traditional Steam-style direct connect using the server’s IP address and UDP port. This depends on your network and your host exposing it, so it isn’t available everywhere.
For the vast majority of players, the Game ID is the path of least resistance. Start there, and only fall back to direct IP if your host specifically supports it.
Method A: Connect with the Game ID (recommended)
Every Core Keeper server generates a unique Game ID that looks something like WRzngFnLmIRcMHfWGhegp2. This is the key your players need. There are two reliable places to find it.
Finding the Game ID in the server console
When the dedicated server boots, it prints the Game ID directly to the server console output. If you’re running it in a terminal or watching the panel’s live console, scan the startup log for a line containing the Game ID. This appears every time the server starts, so a quick restart will surface it again if you missed it.
Reading the Game ID from a file
On a self-hosted Linux box, the Game ID is also commonly written to a file so you can grab it without scrolling the console. The exact path depends on where you installed the server, but it’s typically something like this:
cat /home/corekeeper/server/GameID.txtYou can also set the Game ID manually in ServerConfig.json by filling in the gameId field (more on that below). Setting it manually means the same Game ID survives restarts, which is handy if you want to hand out a permanent join code that never changes.
Joining with the Game ID, step by step
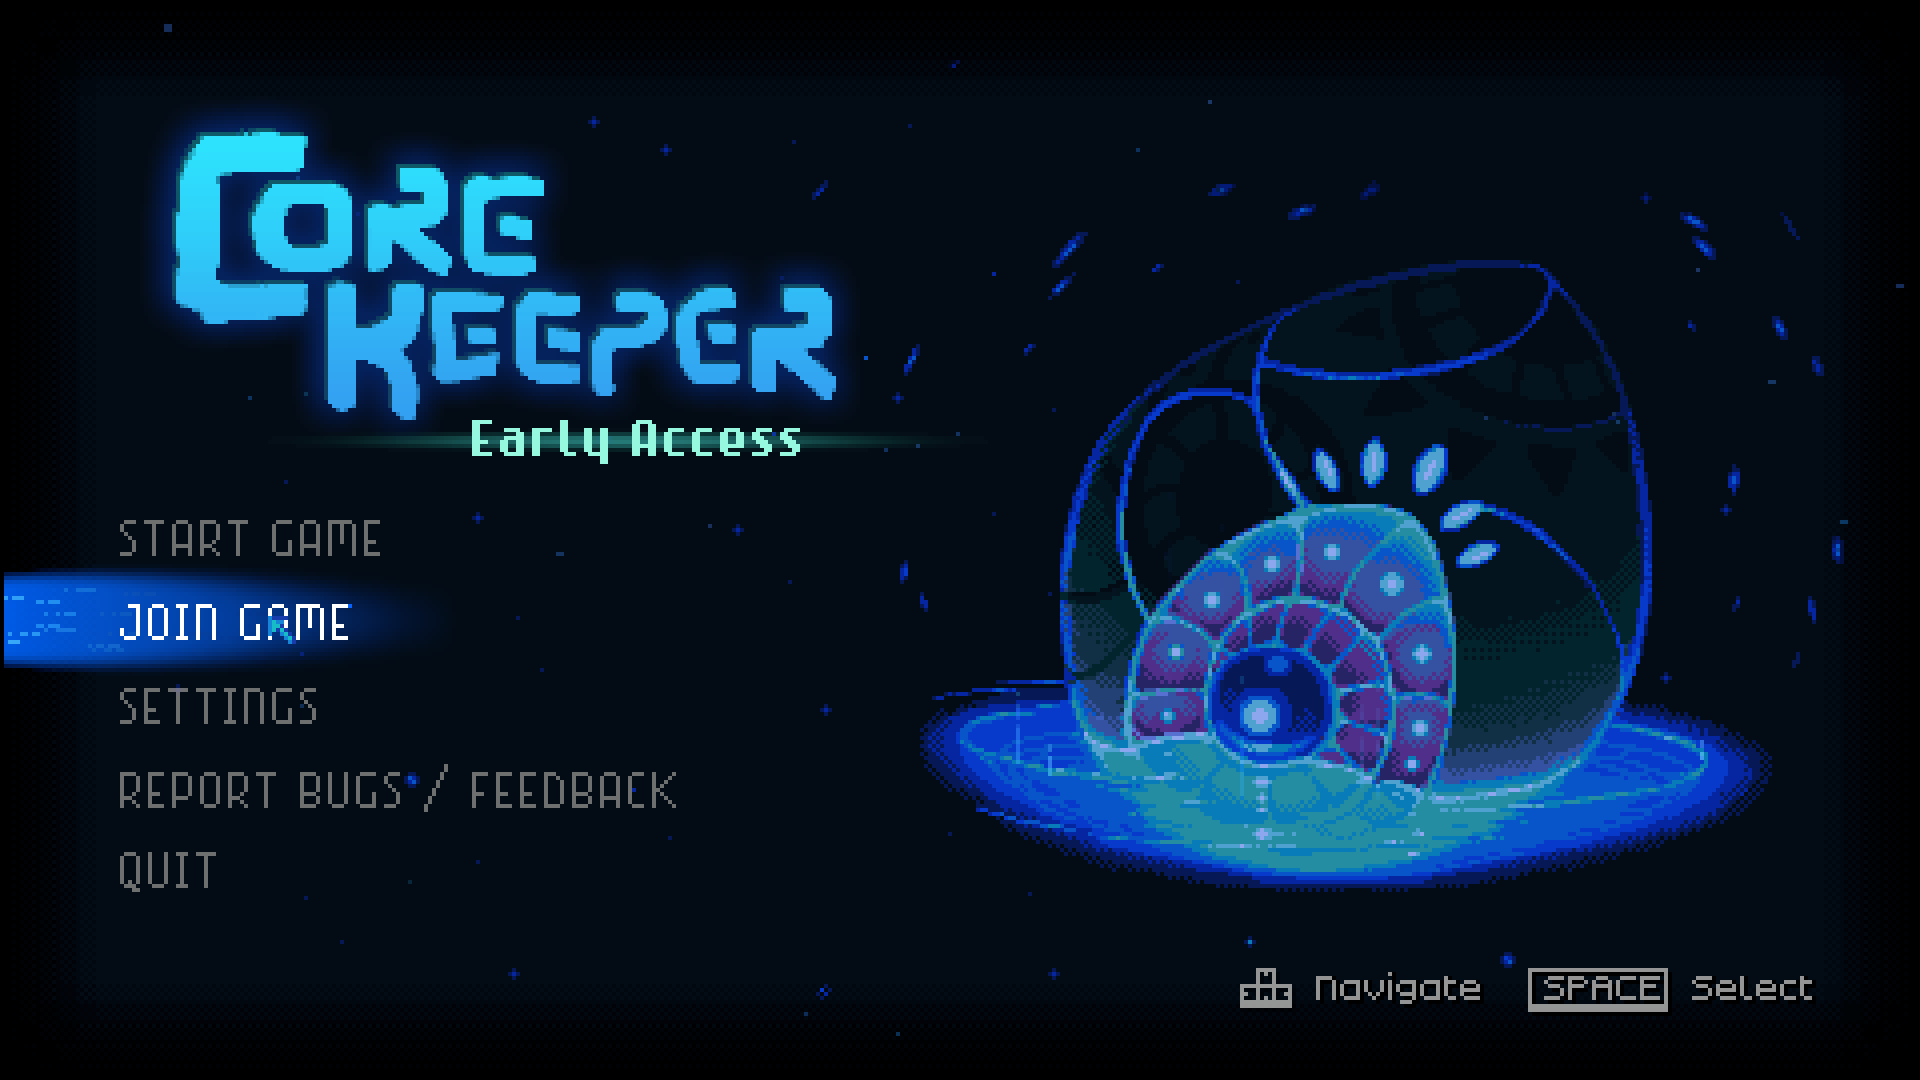
- Launch Core Keeper from your library.
- From the main menu, select Join Game.
- Paste the Game ID into the field provided.
- If the server has a password set, enter it when prompted.
- Confirm, and the game connects you to the dedicated server’s world.
That’s the whole flow. Because it routes through Core Keeper’s relay, you generally don’t need to touch your router. Share the Game ID (and password, if any) with your group and they’re in.
Method B: Connect by direct IP and port
Some hosting panels expose a “Steam Direct Connect” option using the server’s IP:Port. This is the more traditional approach, and it can be useful for LAN play, dedicated boxes with a static public IP, or hosts that prefer it. The catch is that availability is host-dependent, and unlike the Game ID path, direct connect depends on your ports being open and reachable.
Ports you need to open
Core Keeper’s default game port is UDP 27015. Communication uses a pair of UDP ports, so the safe recommendation is to open 27015–27016 UDP on your firewall and router. If you’re forwarding from a home network, some guides specifically call out 27016 as a port that needs forwarding, so opening the full pair avoids guesswork.
| Port | Protocol | Purpose |
|---|---|---|
| 27015 | UDP | Default game connection port |
| 27016 | UDP | Companion port — open alongside 27015 |
Ports are the number-one reason direct connect fails. If players can’t reach the server by IP but the Game ID works, that’s a strong sign the relay is doing its job while your port forwarding isn’t. In that case, just use the Game ID and move on, or fix the forwarding on your router.
ServerConfig.json: the settings that control who connects
The server is configured through a single file, ServerConfig.json. This controls the Game ID, which world loads, the display name, and the player cap. Here’s the canonical default reference file:
{
  "gameId": "",
  "world": 0,
  "worldName": "SERVERNAME",
  "worldSeed": 0,
  "maxNumberPlayers": 100,
  "maxNumberPacketsSentPerFrame": 1
}| Key | What it does | Default |
|---|---|---|
gameId | The Game ID players join with. Auto-generated if left empty; set it manually for a permanent code. | "" (auto) |
world | Which save slot to load — matches the number on the .world.gzip file. | 0 |
worldName | Display name of the server/world. | "SERVERNAME" |
worldSeed | World-generation seed; 0 means randomly generated. | 0 |
maxNumberPlayers | Maximum simultaneous players. | 100 (set to 8 — see below) |
maxNumberPacketsSentPerFrame | Network tuning value. | 1 |
One important gotcha: the reference file ships with maxNumberPlayers set to 100, but Core Keeper’s actual co-op session cap is 8 players. Set this to 8 for accuracy — the higher number doesn’t grant extra slots, it just misrepresents reality. Note also that field names can vary by host: the official file uses maxNumberPlayers and worldName, but some host panels relabel these as maxPlayers and serverName. If you’re editing through a panel, match whatever labels it shows.
You may also see extra fields in some guides or host configs — things like worldMode (Normal/Hard/Creative/Casual), season or seasonOverride for holiday events, and a password field. These appear in host-specific or newer configs and aren’t part of the canonical default file shown above, so treat them as version- or host-dependent and verify the exact values against your current setup before relying on them.
Where the config file lives
- Windows:
%USERPROFILE%\AppData\LocalLow\Pugstorm\Core Keeper\DedicatedServer\ServerConfig.json - Linux: under
/home/— host panels commonly surface it as/.config/unity3d/Pugstorm/Core Keeper/DedicatedServer/ /core-keeper/DedicatedServer/ServerConfig.json
Loading the right world before anyone connects
If you’ve uploaded an existing single-player world or migrated from another host, players will connect to whatever world the server loads — so make sure it’s the right one. Each Core Keeper world is a single compressed file named by slot number: 0.world.gzip, 1.world.gzip, and so on. The server loads whichever slot the world field in ServerConfig.json points to.
- On the server, open the worlds directory, typically
/core-keeper/DedicatedServer/worlds/. - Upload your world file ending in
.world.gzip(use SFTP/FTP for larger files, or drag-and-drop in a panel for small ones). - If the file isn’t
0.world.gzip— say it’s3.world.gzip— set"world": 3in the config. - Restart the server. It loads the matching slot and prints the Game ID at startup, ready for players to join.
Your local single-player saves on Windows live under C:\Users\. The AppData folder is hidden by default, so enable “Show hidden items” in File Explorer to see it.
Quick troubleshooting
- Players can’t find the Game ID: Restart the server and watch the console — it prints on every startup. Or read it from
GameID.txt. Pinning it viagameIdin the config keeps it constant. - Direct IP fails but Game ID works: Almost always a port-forwarding issue. Confirm UDP 27015–27016 are open, or just use the Game ID.
- Wrong world loads: Check the
worldinteger matches the number on your.world.gzipfile. - Password rejected: Make sure the password is being entered exactly, and that the field is actually supported by your host’s config version.
Frequently asked questions
What is the Game ID in Core Keeper?
It’s a unique, auto-generated code (for example WRzngFnLmIRcMHfWGhegp2) that the server prints to its console at startup. Players paste it into the Join Game screen to connect. It uses Core Keeper’s relay system, which is why it works through NAT without port forwarding in most cases.
Do I need to forward ports to connect to a Core Keeper server?
Not for the Game ID method — it’s relay-based and NAT-friendly. Port forwarding only matters for the direct IP:port method, where you’d open UDP 27015 (and 27016 alongside it).
What port does a Core Keeper server use?
The default game port is UDP 27015. Core Keeper uses a UDP pair, so open 27015–27016 UDP to cover both. If forwarding from a home network, be sure 27016 is included.
How many players can join a Core Keeper server?
The co-op session cap is 8 players. The reference ServerConfig.json ships maxNumberPlayers as 100, but that doesn’t add slots — set it to 8 to reflect the real limit.
Can I connect using a Steam direct connect by IP?
Some hosting panels expose a Steam Direct Connect option using IP:Port, but availability is host-dependent and requires your ports to be reachable. The Game ID is the standard, more reliable join method.
How do I keep the same Game ID after a restart?
By default the Game ID auto-generates. To lock it in, set the gameId field in ServerConfig.json to a value of your choice so the same join code persists across restarts.
Ready to play?
Run your own Core Keeper server with XGamingServer
Spin up an always-on Core Keeper server your friends can join in minutes — no port-forwarding, no tech headaches.