
Table of contents
- Introduction
- Add edit the Palworld server config file
- Let’s Look at the Settings in Details
- Day Time Speed: Mastering the Passage of Time
- EXP Rate: Optimizing Experience Gain
- Pal Capture and Appearance Rates: Enhancing Companion Dynamics
- Damage Settings: Fine-Tuning Combat Intensity
- Hunger and Stamina Management: Prolonging Survival
- Health Regeneration: Managing Recovery Dynamics
- Structural Integrity: Balancing Building Durability
- Structure Deterioration Rate: Balancing Challenge and Enjoyment
- Gatherable Items Multiplier: Resource Management
- Gatherable Objects HP Multiplier: Harvesting Dynamics
- Gatherable Objects Respawn Interval: Resource Availability
- Dropped Items Multiplier: Loot Dynamics
- Time to Incubate Eggs: Breeding Strategy
- Enable Raid Events: Enhancing the Challenge
- Conclusion
Introduction
Welcome to our comprehensive guide on optimizing game settings for an enhanced gameplay experience in Palworld server. As avid gamers and technical enthusiasts, we understand the importance of tailoring game settings to suit individual preferences and playstyles. This article delves into the various settings available in Palworld, explaining how each one affects your gameplay and offering expert advice on finding the perfect balance for your gaming sessions.
Add edit the Palworld server config file
How to edit Palworld config file
- Login to the panel
Once on the panel , select your Palworld Server
- Stop the Palworld Server
This is to make sure the changes made to the config file take effect
- Locate the
DefaultPalWorldSettings.iniand copy all the content/home/container/DefaultPalWorldSettings.ini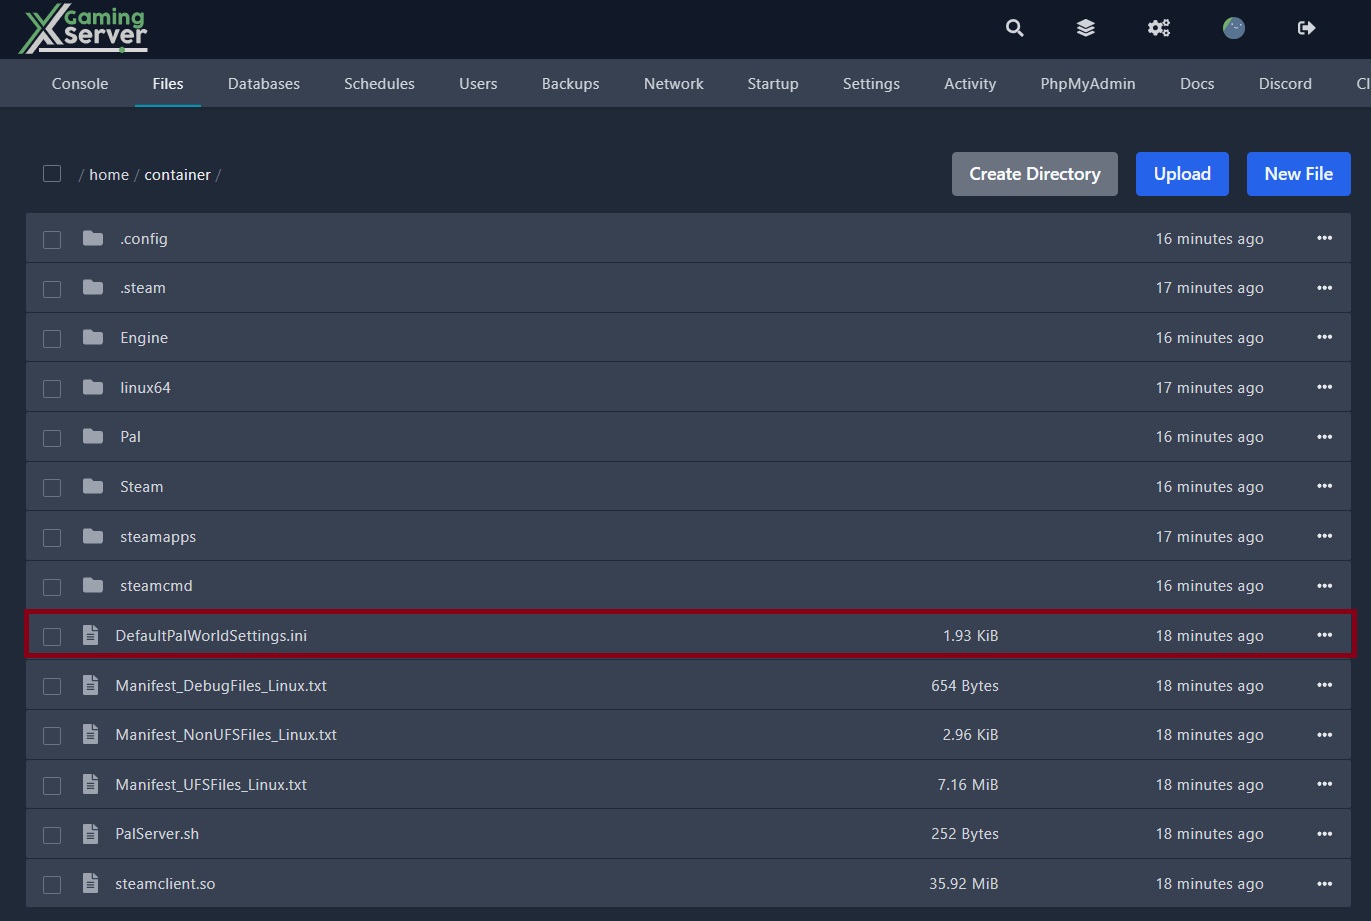
- Copy the contents and navigate to
/Pal/Saved/Config/LinuxServer/PalWorldSettings.ini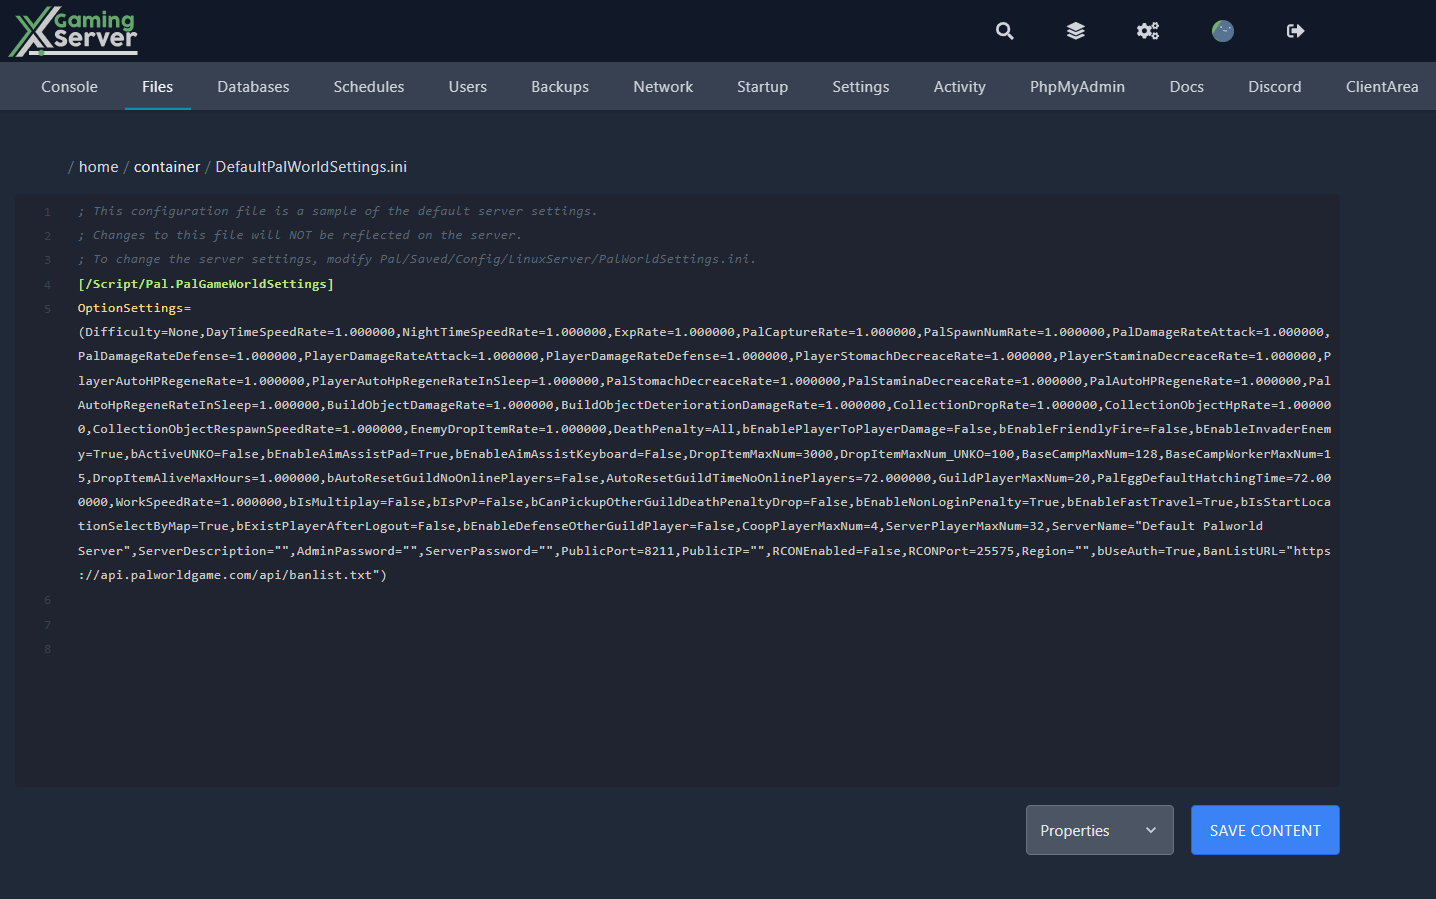
- Paste everything into
PalWorldSettings.ini
Let’s Look at the Settings in Details
Day Time Speed: Mastering the Passage of Time
Understanding the Setting
- Default Speed (1x): The game progresses at the standard rate, offering a balanced day-night cycle.
- Half Speed (0.5x): Slows down the day’s progression, ideal for players who prefer a more leisurely pace.
- Double Speed (2x): Accelerates time, challenging players to manage their activities more swiftly.
Strategic Applications
- Leisurely Gameplay: Use 0.5x to immerse yourself in the game world without feeling rushed.
- Fast-Paced Challenges: Opt for 2x to test your time management and quick decision-making skills.
EXP Rate: Optimizing Experience Gain
Setting Variations
- Normal Gain (1x): Standard rate of experience acquisition.
- Reduced Gain (0.5x): Slows down leveling up, suitable for those seeking a more challenging progression.
- Enhanced Gain (2x): Doubles the rate of experience gain, perfect for players looking to level up quickly.
Best Practices
- New Players: Starting with a 1x rate helps in understanding game mechanics.
- Experienced Players: Switching to 2x can be rewarding for those aiming to reach higher levels faster.
Pal Capture and Appearance Rates: Enhancing Companion Dynamics
Capture Rate
- Default (1x): Balanced difficulty in capturing Pals.
- Increased Difficulty (0.5x): Makes Pal capture twice as hard, adding a layer of challenge.
- Eased Difficulty (2x): Simplifies the capture process, ideal for casual gameplay.
Appearance Rate
- Normal (1x): Standard spawn rate for Pals.
- Reduced Groups (0.5x): Lesser Pals appear, increasing the game’s difficulty.
- Enhanced Groups (2x): Larger groups, including bosses, spawn more frequently, ideal for action-packed sessions.
Damage Settings: Fine-Tuning Combat Intensity
Damage From/To Pals
- Default (1x): Standard damage metrics for a balanced combat experience.
- Reduced Impact (0.5x): Halves the damage dealt and received, suitable for a less aggressive playstyle.
- Increased Impact (2x): Doubles the damage parameters, perfect for those seeking heightened combat challenges.
Player-Specific Damage Settings
- Normal (1x): Offers a balanced player combat experience.
- Reduced (0.5x): Decreases the intensity of combat for players.
- Increased (2x): Amplifies the stakes in player encounters.
Hunger and Stamina Management: Prolonging Survival
Hunger Depletion Rate
- Default (1x): Standard rate of hunger depletion.
- Slower Depletion (0.5x): Reduces the frequency of needing to eat, easing survival.
- Faster Depletion (2x): Increases the survival challenge by requiring more frequent nourishment.
Stamina Reduction Rate
- Normal (1x): Balanced stamina depletion rate.
- Decreased Rate (0.5x): Stamina depletes slower, beneficial for extended exploration.
- Increased Rate (2x): Intensifies gameplay by necessitating careful stamina management.
Health Regeneration: Managing Recovery Dynamics
Pal and Player HP Regeneration
- Normal Rate (1x): Standard health regeneration speed.
- Slowed Regeneration (0.5x): Prolongs the healing process, adding to the game’s challenge.
- Accelerated Regeneration (2x): Fast-tracks recovery, suitable for a more forgiving gameplay experience.
Sleep Health Regeneration
- Standard Rate (1x): Normal healing speed during sleep.
- Reduced Rate (0.5x): Slows down health recovery while sleeping.
- Enhanced Rate (2x): Doubles the healing speed during rest periods.
Structural Integrity: Balancing Building Durability
Damage to Structures
- Normal (1x): Standard damage resistance for structures.
- Increased Resistance (0.5x): Structures take half the damage, ideal for defensive gameplay.
- Reduced Resistance (2x): Structures are more vulnerable, adding a strategic challenge to base management.
Structure Deterioration Rate: Balancing Challenge and Enjoyment
Understanding the Setting
- The Structure Deterioration Rate in Palworld plays a crucial role in determining the longevity and maintenance requirements of your base buildings and objects.
- Normal Rate (1): Offers a balanced experience, where the wear and tear on structures occur at a designed pace, suitable for players who enjoy regular maintenance and realism in gameplay.
- Reduced Rate (0.5): Ideal for casual players or those new to the genre. It halves the rate of deterioration, allowing more time for exploration and less focus on maintenance.
- Increased Rate (2): Doubles the deterioration rate, posing a challenging scenario for experienced players seeking a more demanding survival experience.
Maximum Number of Dropped Items in the World
Impact on Gameplay
- The setting for the maximum number of dropped items in the world affects how long items remain before despawning.
- Default (30000): A balanced setting where items persist for a reasonable duration before disappearing.
- Immediate Despawn (0): Useful for high-performance gameplay, as it prevents clutter and potential lag by instantly removing dropped items.
Note on Performance
- Higher limits on dropped items can significantly impact game performance, particularly in multiplayer settings. Players should consider their system capabilities when adjusting this setting.
Gatherable Items Multiplier: Resource Management
Setting Implications
- This setting determines the abundance of resources obtained from gatherable items.
- Default (1): Standard resource yield, suitable for a balanced gameplay experience.
- Reduced Yield (0.5): Halves the resource output, adding an element of scarcity and challenge.
- Increased Yield (2): Doubles the resources, ideal for more casual gameplay or faster progression.
Gatherable Objects HP Multiplier: Harvesting Dynamics
Understanding the Setting
- The health of gathering nodes affects the effort required to harvest resources.
- Default (1): Standard health level, providing a balanced harvesting experience.
- Reduced Health (0.5): Nodes require fewer hits to harvest, but yield fewer resources. Ideal for quicker gameplay.
- Increased Health (2): Nodes need more hits, prolonging the harvesting process but not affecting resource quantity.
Key Consideration
- Changing this setting in an existing world will not affect current nodes until they are harvested and respawn. This setting also influences tool durability, as more hits result in quicker wear.
Gatherable Objects Respawn Interval: Resource Availability
Setting Impact
- This setting adjusts the respawn rate of resources in the game world.
- Normal Rate (1): Standard respawn interval, maintaining a balanced resource availability.
- Faster Respawn (0.5): Resources regenerate more quickly, reducing wait times for re-harvesting.
- Slower Respawn (2): Extends the interval between resource respawns, increasing the survival challenge.
Dropped Items Multiplier: Loot Dynamics
Gameplay Effect
- This setting determines the quantity of loot dropped by enemies.
- Normal Amount (1): Standard loot drop rate.
- Reduced Loot (0.5): Halves the loot quantity, suitable for a more challenging experience.
- Increased Loot (2): Doubles the loot, enhancing the reward for combat and exploration.
Time to Incubate Eggs: Breeding Strategy
Incubation Periods
- Adjusting the incubation time for eggs affects the breeding strategy in the game.
- Normal Rate (1 hour for largest egg): Standard incubation period.
- Instant Hatch (0): Eggs hatch immediately, useful for rapid breeding.
- Extended Period (72 hours for largest egg): Lengthens the breeding process, adding realism and challenge.
Enable Raid Events: Enhancing the Challenge
Deciding on Raids
- Enabling or disabling NPC/Wild Pal raids can dramatically change the gameplay experience.
- Enabled Raids (Yes): Introduces unexpected challenges and the need for defensive strategies.
- Disabled Raids (No): Suitable for a more peaceful building and exploration experience.
Conclusion
Understanding and fine-tuning these settings can profoundly enhance your multiplayer experience in Palworld. Whether you’re seeking a relaxed play session with friends or a challenging co-op adventure, these adjustments offer the flexibility to create a gaming environment that meets your needs and preferences. Remember, experimentation is key
Take a look at the original documentation by Palworld developers
Looking to host a dedicated Palworld server? Host one with us

Ready to play?
Run your own Palworld server with XGamingServer
Spin up an always-on Palworld server your friends can join in minutes — no port-forwarding, no tech headaches.